Profile: samlsecurity
What is SAML2?
SAML stands for Security Assertion Markup Language and is used to provide Single-Sign-On (SSO) services to end users. It is used as a data exchange format between Service Providers (web applications that require their users to be authenticated) and Identity Providers (web applications that provide the required authentication). The iGrafx Platform acts as a Service Provider (SP) in this scenario, while your ADFS server or Okta instance acts as an Identity Provider (IDP).
Prerequisites
SAML2 authentication will only work if all involved SPs and IDPs are available via https. Follow the article about setting up SSL for your iGrafx Platform instance and make sure your IDP also uses https. All the users that are known to your IDP that require access to iGrafx Platform must be present in the iGrafx platform. Users can be added to iGrafx Platform either by connecting to an Active Directory or by manual or automated import of your users (the latter can be achieved through our REST API). If a user authenticates via SAML2 that is not known in the iGrafx Platform, the user will receive a permission denied error upon login.
Set up a SAML2 keystore
A keystore file samlKeystore.jks has to be placed in your iGrafx Base directory that is used to sign, verify IDP and SP metadata as well as SSL connections. The file is loaded once on iGrafx Platform service startup. For the iGrafx Platform to be able to sign SAML messages with a key, follow these steps:
-
Copy the file
openjdk-11.0.x\lib\security\cacertsfrom your installation directory toigrafxdata\samlKeystore.jksto bootstrap your keystore with the existing Java certificate store. Usechangeitwhen you are prompted for the keystore password in the following examples. You can change the password if you want, refer to the below linked documentation to change the keystore password later. -
Now either
-
Add your production-ready private key to the keystore by using the java keytool. Refer to http://docs.spring.io/spring-security-saml/docs/current/reference/html/security.html#configuration-key-management-private-keys on how to create, import and modify keys in the
samlKeystore.jksfile via the command line. -
Create a new self-signed certificate with the following command (the keytool command is located in the
bindirectory of your Java installation)keytool -genkey -keyalg RSA -alias %KEYALIAS% -keystore samlKeystore.jks -keypass %KEYPASS% -validity 360 -keysize 2048Replace
%KEYALIAS%and%KEYPASS%with an alias for your private key and the password for that key. This command will set the key password you specify and will prompt for setting a store password afterwards. Follow the on-screen instructions after setting the store password to complete the creation of the keystore file.
-
-
Copy the
samlKeystore.jksfile into your base directory -
Open the
igrafx.propertiesfile in your base directory -
Uncomment (or add if not already present) the line
igrafx.usercentral.saml.keystorepass=and append your keystore password (if using the default password, this will bechangeit -
Uncomment (or add if not already present) the line
igrafx.usercentral.saml.defaultalias=and append the alias you used for the private key that you want to use to sign your metadata -
Uncomment (or add if not already present) the line
igrafx.usercentral.saml.defaultpassword=and append the password you have used for the private key -
Restart the iGrafx Platform service.
-
The Service Provider metadata file you download later in these instructions will now be signed with this private key. You might need to update the metadata in your respective Identity Provider if you have already uploaded your metadata file to an ADFS or other SAML IDP in the past.
How to set up SAML2 authentication
The configuration of 3rd party software i.e. Operating Systems, Databases, Application Server, etc., in the context of this documentation is for illustration purposes only. iGrafx doesn't imply that the provided examples are the best or only way of configuration for the described scenario. Nor can we guarantee that it is the best option for performance and security. You apply the instructions at your own risk, please consult an expert of the 3rd party software if you are not sure.
Azure Active Directory
-
Perform the SAML Keystore setup - make sure to start from the existing default Java Keystore "cacerts" in your JRE/lib/security folder, instead of creating a new, empty one
-
Change the authentication scheme to "
samlsecurity"according to this article about changing the authentication schema. -
Restart the platform
-
Log in to your Azure account at https://portal.azure.com
-
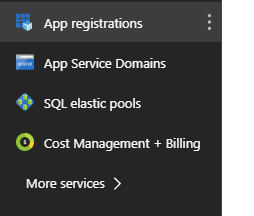
Search for the
App Registrationservice in the left-hand panel. If it doesn't appear, use theMore servicesbutton to look for it (and possibly favorite it by clicking the star)
-
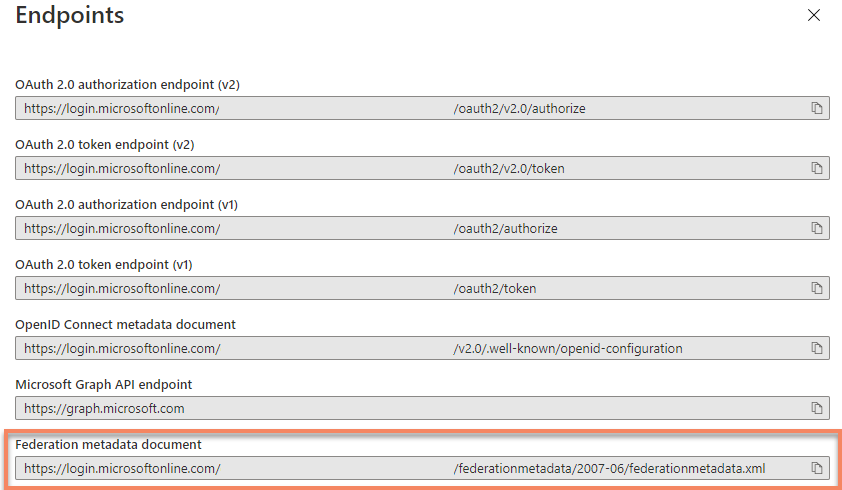
Click on
Endpointsin the App registrations header

-
Looking at the endpoint list, add the top URL (of the Metadata file) to your clipboard
-
Provide the metadata URL by going to
Administration -> User Management -> SAML, and click UPDATE IDENTITY PROVIDER METADATA and follow the options for adding a metadata URL. -
Change the Name ID policy on the same page to
Email -
Back in the Azure Portal, close the endpoint blade and click
New registration
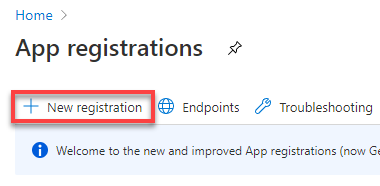
-
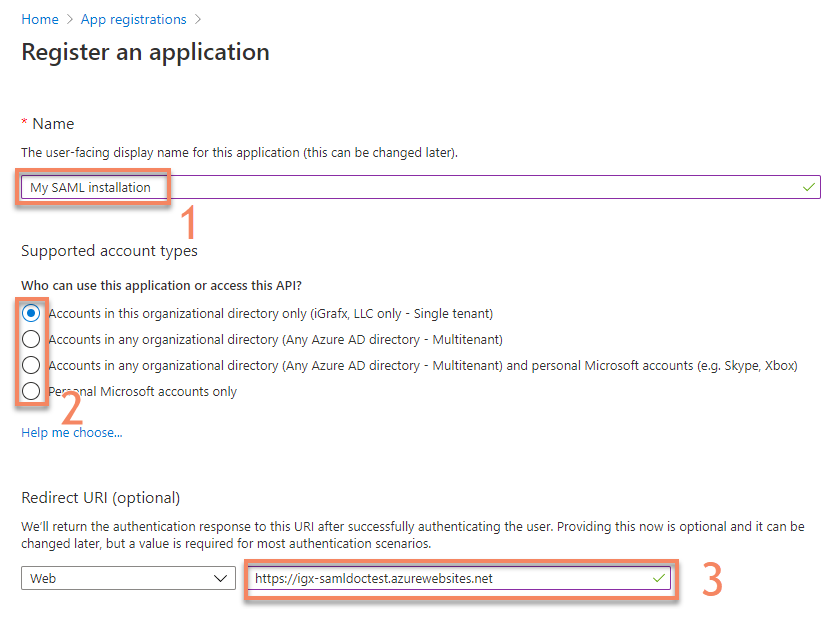
Enter a name for your application registration that allows you to identify it (1), select the account types that can log in (2) and enter the HTTPS URL under which your installation will be available (3). Then press
Registerat the bottom
-
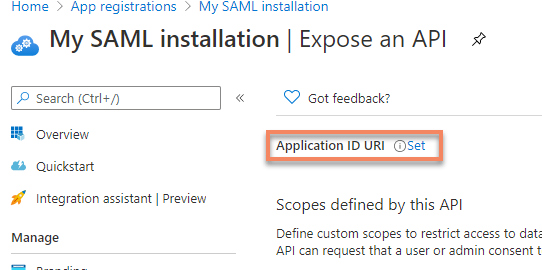
On your new App registration click
Add an Application ID URIon the right side

-
On the blade that now opens, click
Setto add a new Application ID URI
-
Copy the autogenerated
App ID URIfrom the properties panel (or set your own) (1) and clickSave(2)
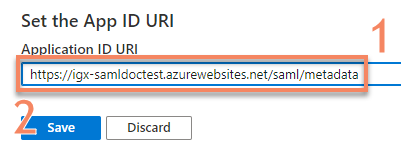
-
Paste the
Application ID URIyou copied in the previous step into yourigrafx.propertiesas described belowigrafx.usercentral.saml.entityId=YOUR_APP_ID_URI
-
Restart your iGrafx Platform service
Microsoft ADFS Server
-
Perform the SAML Keystore setup
-
Change the authentication scheme to "
samlsecurity"according to this article about changing the authentication schema. -
If you did not do so in Step 2 above, restart the iGrafx Platform service
-
Log in to your iGrafx Platform via https and go to
Administration -> User Management -> SAML -
Click
DOWNLOAD SERVICE PROVIDER METADATAand save thespring_saml_metadata.xmlfile to your hard drive -
In AD FS 2.0 Management Console (in Control Panel - Administrative Tools) select "Add Relying Party Trust". Note: you may need to install Active Directory Federation Services.
-
Select "Import data about the relying party from a file" and select the
spring_saml_metadata.xmlfile you just downloaded. Click Next -
The wizard may complain that some content of the metadata is not supported. You can safely ignore this warning
-
Enter a Display name and click Next
-
Leave "I do not want to configure multi-factor authentication settings for this relying party trust at this time" checked and click Next
-
Leave "Permit all users to access this relying party" checked and click Next
-
On the "Ready to Add Trust" make sure that the tab "endpoints" contains multiple endpoint values. If not, verify that your metadata was generated with HTTPS protocol URLs
-
Leave "Open the Edit Claim Rules dialog" checkbox checked and finish the wizard
-
Select "Add Rule", choose "Send LDAP Attributes as Claims" and press Next
-
Add NameID as "Claim rule name", choose "Active Directory" as Attribute store, choose "E-Mail-Addresses" as LDAP Attribute and "Name ID" as "Outgoing claim type", finish the wizard and confirm the claim rules window
-
Download your Identity Provider metadata from https://YOUR_ADFS_SERVER/FederationMetadata/2007-06/FederationMetadata.xml.
-
Upload the IDP metadata FederationMetadata.xml file by going to
Administration -> User Management -> SAML, and click UPDATE IDENTITY PROVIDER METADATA. -
Download JCE Unlimited Policy and place the 2 jar files in your lib/security directory of your JDK or JRE. (seeJCE Unlimited Policysection below) -
Restart the iGrafx Platform service
-
You should now be forwarded to the ADFS login page when trying to access the iGrafx Platform
Support for SHA1 configuration can be forced if needed using the following settings in your igrafx.properties file (SHA256 configuration should still support SHA1 party trust configuration unless your devices do not support SHA256)
igrafx.usercentral.saml.signatureAlgorithm=SHA1
There could be a case where users may encounter a "Bad Request - Request Too Long" error appearing when opening their iGrafx Platform in the browser when using ADFS. Simply clear the browser cookie and login with ADFS credentials again.
See also: ADFS Auto Creation of Authenticated Users
Okta
-
Perform the SAML Keystore setup
-
Change the authentication scheme to "
samlsecurity"according to this article about changing the authentication schema. -
Restart the iGrafx Platform service
-
Log in and go to
Administration -> User Management -> SAML -
Click
DOWNLOAD SERVICE PROVIDER METADATAand save thespring_saml_metadata.xmlfile to your hard drive -
Login to Okta as an administrator, select Applications and click Create New App
-
From the list of supported protocols select SAML 2.0 and press Create
-
Define app name (e.g. iGrafx) and optionally define app image and press Next
-
Configure SAML with the following settings:
Setting
Value
Single Sign on URL
https://yourinstance/saml/SSO
Audience URI (SP Entity ID)
Enter the value from the
<md:EntityDescriptor entityID="???">attribute of thespring_saml_metadata.xmlfile downloaded aboveRelay State
Leave blank
Name ID format
Unspecified
Application username
Select any of the available options, depending on your requirements.
IMPORTANT: Make sure that the selected usernames will map to login names that exist in your iGrafx Platform
-
Finish your Okta application creation
-
Optional: Open your application configuration and go to the people page to configure custom username mappings
-
Go to the
Sign Ontab in your Okta application configuration page and download the Okta Identity Provider metadata by clicking on theIdentity Provider metadatalink or copying the URL. -
Provide the metadata URL or upload the FederationMetadata.xml file by going to
Administration -> User Management -> SAML, and click UPDATE IDENTITY PROVIDER METADATA and follow the options for a metadata URL or file, respectively. -
You can now test if you are forwarded to your identity provider and can log in by going to the base URL of your Design application and clicking Sign-in via SSO on the login page
-
Restart the iGrafx Platform service to disable the login form
-
You should now be forwarded to the Okta login page when trying to access the iGrafx Platform
Centrify
-
Perform the SAML Keystore setup
-
Change the authentication scheme to "
samlsecurity"according to this article about changing the authentication schema. -
Edit the
igrafx.propertiesfile to set your entity ID as described below in "Other options" tohttps://yourinstance/saml/metadata -
Restart the iGrafx Platform service
-
Log in and go to
Administration -> User Management -> SAML -
Click
DOWNLOAD SERVICE PROVIDER METADATAand save thespring_saml_metadata.xmlfile to your hard drive -
Select the Custom tab and pick SAML, then confirm
-
Go to the Application Settings area in your Centrify Web App and use Upload SP Metadata to upload the
spring_saml_metadata.xmlfile generated by the iGrafx Platform -
Provide the metadata URL or upload the FederationMetadata.xml file by going to
Administration -> User Management -> SAML, and click UPDATE IDENTITY PROVIDER METADATA and follow the options for a metadata URL or file, respectively. -
Map the Centrify roles that are allowed to access the iGrafx Platform in the User Access area
-
Restart your iGrafx Platform service
Remote Metadata
If you are using an IDP that changes its metadata from time to time (for example for rolling over signing keys), you can also point the iGrafx Platform to a metadata file in the web and have the platform download it automatically. To do that, follow these steps:
-
Go to
Administration -> User Management -> SAML, and click UPDATE IDENTITY PROVIDER METADATA and follow the options for a metadata URL -
Optional: If the metadata URL is HTTPS, which it usually is, you may have to download the certificate for the respective website and import it into your SAML Keystore using the following command
keytool -import -alias ALIAS_FOR_IDP -file YOUR_IDP_CERTIFICATE_FILE.cer -keystore samlKeystore.jks
-
Restart the iGrafx Platform service if you had to add a new certificate
User Mapping
When the IDP authentication is successful, the IDP will forward the user to the iGrafx Platform and send a login name along with the authentication assertion. The user name depends on the IDP setup, but many online providers default to using the e-mail address. In that case, the login name of your users within the iGrafx Platform must be their e-mail address. It is not sufficient for the e-mail address field to be populated. If you want the platform login names to be something other than the e-mail address, you can set up your IDP to send a different user info field as the login name when performing a SAML authentication. The configuration depends on your IDP.
Other options
If you want to use the form-based login in parallel with SAML authentication, you can uncomment or add the property igrafx.usercentral.saml.locallogin=true in your igrafx.properties file in your base directory and restart your server. You can now use the login form at https://your-instance/Login to login using local authentication. This is also useful for debugging SAML authentication issues with a local user. We do NOT recommend this setup for production systems as users will be redirected to the login page at times, even if they authenticated via SAML before.
If you want to use a specific entity ID for your instance instead of the autogenerated one, uncomment or add the property igrafx.usercentral.saml.entityId=YOUR_ENTITY_ID to your igrafx.properties file and restart your server. Make sure to update your Identity Provider with the new metadata from your application afterwards.
If you server is available at multiple URLs or behind a proxy, it is sometimes useful to be able to determine the base URL for your entity. You can set the base URL (useful for redirect/POST artifact bindings) by adding the property igrafx.usercentral.saml.entityBaseUrl=URL_OF_YOUR_PLATFORM to your igrafx.properties file.
Should you want to enforce a specific NameID policy for the IDP that is not Unspecified or Email, you can use the property igrafx.usercentral.saml.nameId. Possible values are:
-
unspecified (default)
-
entity
-
kerberos
-
windowsdomain
-
x509
-
email
-
persistent
JCE Unlimited Policy
In some cases, the encryption used by the Identity Provider or your private key might be stronger than the default JRE/JDK allows. If this is the case, issues with decrypting SAML messages or private keys might be resolved by installing the JCE Unlimited Jurisdiction Policy that is appropriate for your JRE/JDK version:
-
JRE7/JDK7: http://www.oracle.com/technetwork/java/javase/downloads/jce-7-download-432124.html
-
JRE8/JDK8: http://www.oracle.com/technetwork/java/javase/downloads/jce8-download-2133166.html
Download the files and place the two included JAR files in the lib/security directory of your JRE or JDK. Overwrite (and possibly back up) the existing policy files to allow stronger encryption mechanisms. A server restart is required after installing the new policy files.
Time Skew
Make sure that the server you are running the iGrafx Platform on has a time synchronization service running, so that there is no time difference between your IDP and your SP. If there is a time skew of more than 60 seconds between the two servers, authentication might fail even if the configuration is correct.
Debugging
To properly debug SAML authentication issues, go to Administration -> Support -> Logging Settings
Add each of the below logging classes at DEBUG level to your custom logging configuration:
-
org.springframework.security.saml -
org.opensaml -
PROTOCOL_MESSAGE
This article contains