Before you continue with any upgrade make sure you have a backup of all repository databases as well as the administration database.
Application server upgrade
Stepping Stone Versions
When upgrading from old versions, some versions must be upgraded as intermediate steps first, before proceeding to later versions.
|
Version coming from |
Version to upgrade to |
|---|---|
|
15.x |
16.1.0 |
|
16.0 - 16.2 |
16.3.4 |
|
16.3 - 17.2 |
17.3.3 |
|
17.3 - 17.5 |
17.7.0.758 |
|
17.6 - 18.2 |
18.3.7.941 (⚠️ not 18.3.8) |
|
18.3 and later |
latest |
Example: You are currently on version 16.4, and would like to upgrade to version 18.3. To do so, you must first upgrade to 17.3, and then to 17.7 next, before proceeding to 18.3.
You can access the stepping stone upgrade versions by providing your order number and date at https://www.igrafx.com/support/licensed-software/
Upgrade from 15
Please see Migrating to the iGrafx Platform if you are migrating from iGrafx Process Central and iGrafx Web Central (15.x) to the iGrafx Origins Platform.
Upgrade from 16.3 or later to 17.3 and newer
The below instructions apply only if your current installation is version 16.3 or later! If your installation is older please see Upgrade from 16.2 or older
Please see the instructions for WAR file deployments below.
Predeployed Tomcat on Windows
The Predeployed Tomcat on Windows has been upgraded to Tomcat 9.0 in 17.5. Previous releases of the iGrafx platform (16.3.x through 17.2.x) shipped with Tomcat 8, and 17.3.x through 17.4.x shipped with Tomcat 8.5.
If you made customizations to the platform service, like using a non default security schema, Java memory setting or additional on startup configuration variables or if you are not sure that you have all the required information available we recommend making a note of the existing service settings in Step 3, and re-applying them after Step 9.
-
Back up ALL relevant databases. The administration and repository databases may be in one or in separate databases. You may have multiple repositories!
-
Open a command line and navigate to your existing application installation directory e.g. C:\iGrafx\iGrafxPlatform. Go to the "windows" sub-folder.
-
If you customized the platform service, or are unsure, proceed with this step, otherwise proceed to Step 4. From the command line run "manage_service.bat
iGrafxPlatform" replacing the parameter "iGrafxPlatform" with your deployments service name if you didn't use the previous default.-
In the dialog switch to the Java Tab and copy the settings for memory, security scheme and ports into a text file. You will need them in a later step.
-
Close the dialog
Be careful and make sure you have the information required in the later steps of the instructions before you remove the service.
Gathering the required information may depend on your environment as well as previous customizations made. The below instructions cannot cover all possible settings and we assume you are aware of the changes you made to the installation in previous installations! The information required, but not limited to is:
-
JVM memory adjustments
-
Security scheme used
-
SAML2 configuration
-
Additional customizations made
If you are in doubt please check with iGrafx Professional Services before you proceed.
-
-
-
Run "remove_service.bat
iGrafxPlatform" -
-
-
Rename the existing application installation directory from e.g. C:\iGrafx\iGrafxPlatform to C:\iGrafx\iGrafxPlatform_w.x.y.z (substituting the w, x, y, z appropriately) or any other name allowing you to identify it as the previous version.
-
Extract the iGrafxPlatform*-Predeployed.zip file with the new version. Place the extracted folder in the location you want the application server to run in e.g. C:\iGrafx\iGrafxPlatform
Be wary of zip decompression tool warnings. Do not ignore them. If the decompression flags an error try a different, high level location.
-
Copy the "igrafxdata" folder from your previous base directory you renamed in step 5, into the new base directory you just extracted. e.g. from C:\iGrafx\iGrafxPlatform_w.x.y.z\igrafxdata to C:\iGrafx\iGrafxPlatform\igrafxdata
-
As a best practice, we recommend to archive your log files as needed, then delete all contents from the \igrafxdata\logs folder.
-
If you have modified the server.xml or context.xml files in your Apache Tomcat installation of the previous iGrafx version you need to
It's important to NOT overwrite the new server.xml and content.xml files with those from a previous version.
You can find the XML files in the apache-tomcat-9.x.xx/conf folder in the installation directory.
-
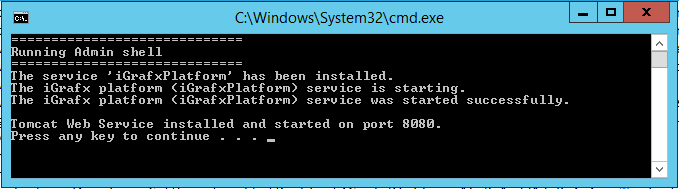
Open a command line and change to the application installation directory i.e. C:\iGrafx\iGrafxPlatform in there go to the "windows" sub-folder and run "install_service.bat 8080"
If you need to specify a different TCP ports, want to use a different service name or used a different authentication scheme you must adjust the installation command. To see the format and default values run "install_service.bat" without a specified port. To check the values you used previously check the notes you took in Step 3.a.
Depending on your operating system and settings you may be asked to confirm elevated UAC permissions to run the installation script. After the installation is completed the service will be automatically started and a confirmation is displayed.
-
If you performed Step 3, proceed with this step, otherwise proceed to step 11. In the command line run "manage_service.bat iGrafxPlatform"
-
Adjust the memory settings according to the notes you took in Step 3.a and any other system properties that were customized.
-
The security scheme and ports should have been defined when running the install_service.bat command before and appear correctly in the dialog.
-
If you had a -XX:MaxPermSize paramter you don't need to set this one in the new version as it is ignored in Tomcat 8 and 9.
-
Close and save the changes via the "Ok" button.
-
Open the Windows Services dialog and restart the service.
-
-
Open a browser and check if you can access the application. Please use a different machine than the server for this test.
-
Check if the below Database adjustments chapter is applicable in your environment and adjust if necessary.
-
If you are using a self-signed certificate or non-standard CA (Certificate Authority) in conjunction with iGrafx Process Automation, update your java keystore to enable secure connections. Follow the details in: Resolving SSL certificate issues when deploying a process
If Step 11 results in the browser showing a setup page asking for database details then you most likely skipped Step 7. To fix it stop the service, check this step again and restart the service.
Upgrade from 16.2 or older
Predeployed Tomcat on Windows
The Predeployed Tomcat on Windows has been upgraded to Tomcat 9 in 17.5. Previous releases of the iGrafx platform (16.3.x through 17.2.x) shipped with Tomcat 8, and 17.3.x through 17.4.x shipped with Tomcat 8.5.
If you made customizations to the platform service, like using a non default security schema, Java memory setting or additional on startup configuration variables or if you are not sure that you have all the required information available we recommend making a note of the existing service settings in Step 3, and re-applying them in Step 10.
-
Back up ALL relevant databases. The administration and repository databases may be in one or in separate databases. You may have multiple repositories!
-
Open a command line and navigate to your existing application installation directory e.g. C:\iGrafx\iGrafxPlatform. Go to the "windows" sub-folder.
-
If you customized the platform service, or are unsure, proceed with this step, otherwise proceed to Step 4. From the command line run "manage_service.bat
Tomcat7" replacing the parameter "Tomcat7" with your deployments service name if you didn't use the previous default (also see the Note on Step 4).-
In the dialog switch to the Java Tab and copy the settings for memory, security scheme and ports into a text file. You will need them in a later step.
-
Close the dialog
Be careful and make sure you have the information required in the later steps of the instructions before you remove the service.
Gathering the required information may depend on your environment as well as previous customizations made. The below instructions cannot cover all possible settings and we assume you are aware of the changes you made to the installation in previous installations! The information required, but not limited to is:
-
JVM memory adjustments
-
Security scheme used
-
SAML2 configuration
-
Additional customizations made
If you are in doubt please check with iGrafx Professional Services before you proceed.
-
-
-
Run "remove_service.bat
Tomcat7"If you are upgrading from a 16.0, 16.1 or 16.2 release, the default service name changed from Tomcat7 to iGrafxPlatform in 16.3.
-
Rename the existing application installation directory from e.g. C:\iGrafx\iGrafxPlatform to C:\iGrafx\iGrafxPlatform_16.2.5.3316 or any other name allowing you to identify it as the previous version.
-
Extract the iGrafxPlatform*-Predeployed.zip file with the new version. Place the extracted folder in the location you want the application server to run in e.g. C:\iGrafx\iGrafxPlatform
Note that the zip file can be extracted to any location you want to use - however we highly recommend a folder near the drive root to minimize the chance of running into the maximum path length boundary (which can vary by operating system). Be wary of zip decompression tool warnings. Do not ignore them. If the decompression flags an error try a different, high level location.
-
Copy the "igrafxdata" folder from your previous base directory you renamed in step 5, into the new base directory you just extracted. e.g. from C:\iGrafx\iGrafxPlatform_16.1.0.311\igrafxdata to C:\iGrafx\iGrafxPlatform\igrafxdata
-
If you have modified the server.xml or context.xml files in your Apache Tomcat installation of the previous iGrafx version you need to
It's important to NOT overwrite the new server.xml and content.xml files with those from the previous version - as the content/format of those files has changed in 16.3. Doing so will prevent the server from starting.
You can find the XML files in the apache-tomcat-7.x.xx/conf folder in the installation directory.
-
Open a command line and change to the application installation directory i.e. C:\iGrafx\iGrafxPlatform in there go to the "windows" sub-folder and run "install_service.bat 8080"
If you need to specify a different TCP ports, want to use a different service name or used a different authentication scheme you must adjust the installation command. To see the format and default values run "install_service.bat" without a specified port. To check the values you used previously check the notes you took in Step 3.a.
Depending on your operating system and settings you may be asked to confirm elevated UAC permissions to run the installation script. After the installation is completed the service will be automatically started and a confirmation is displayed.
-
If you performed Step 3, proceed with this step, otherwise proceed to step 11. In the command line run "manage_service.bat iGrafxPlatform"
-
Adjust the memory settings according to the notes you took in Step 3.a and any other system properties that were customized.
-
The security scheme and ports should have been defined when running the install_service.bat command before and appear correctly in the dialog.
-
If you had a -XX:MaxPermSize paramter you don't need to set this one in the new version as it is ignored in Tomcat 8 and later.
-
Close and save the changes via the "Ok" button.
-
Open the Windows Services dialog and restart the service.
-
-
Open a browser and check if you can access the application. Please use a different machine than the server for this test.
-
Check if the below Database adjustments chapter is applicable in your environment and adjust if necessary.
If Step 11 results in the browser showing a setup page asking for database details then you most likely skipped Step 7. To fix it stop the service, check this step again and restart the service.
WAR file deployments
17.7 requires a minimum of Java 11. iGrafx Platform releases prior to 16.3 worked with with Java 7 (1.7), and prior to 17.7, Java 8 (1.8 or later). If you are not using the Predeployed package, and upgrading from a pre-17.7 version, you will need to upgrade the deployed JRE to Java 11.
Note that the Predeployed packages above mention the use of Tomcat 9.0. You can continue to use the application server of your choice as long as it is compatible with JRE 11.
-
Back up ALL relevant databases. The administration and repository databases may be in one or in separate databases. You may have multiple repositories!
-
Back up the following files and folders. Adjust the path if you didn't use the default locations during the installation of a previous version.
-
On Windows: C:\iGrafx\iGrafxPlatform\igrafxdata
-
-
Deploy the new EAR file or WAR file. The exact steps depend on the deployment mechanism you usually use.
Administration changes
New Permissions
If you are upgrading from 16.2 or earlier, some new features come with new permissions. Mostly new permissions are not granted to security roles by default. You need to enable them for the security roles you want them to be available on. In the browser check the iGrafx Platform Administration > Security Roles. Check the settings for the relevant Server Roles, Repository Roles or Item Roles configurations.
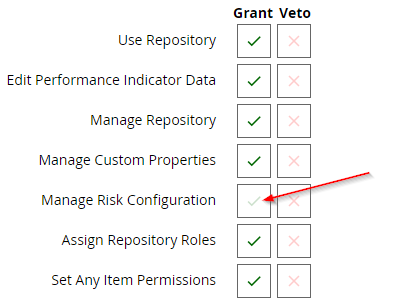
In most repositories the role which is used for normal users usually only has the two permissions Use repository and Edit Performance Indicator Data enabled. All other permissions are considered repository administration permissions and should be handled with care.
Logging
Since 16.2 of the iGrafx platform you can configure logging directly from within the application Administration > Support > Logging Settings area.
Most customers don't use customized log files and find it very helpful to be able to manage the log file settings from within the application when needed.
If you used customized logging you can still continue to use a file based configuration, but you need to use the newer log4j2.xml format, instead of the log4j.properties format. If you have a custom log4j.properties file and want to convert it to the XML format there are online conversion tools available i.e. http://log4j-props2xml.appspot.com/ . Please note we can't support you with questions to the file conversion, nor do we test the combination of file configured logging in parallel with logging configured within the application. We recommend using the log settings available which are supported from within the application.
If you want to configure a central logging system you may find the hints in Configure central logging with Nagioslog helpful.
Database adjustments
Full text engine
Since 16.2 of the iGrafx platform the indexing for the full text search is done by the application server and not by the the Microsoft SQL server. You may want to consider removing the feature from your database instance after you have upgraded the application server:
-
Full-Text and Semantic Extractions for Search
After the upgrade the application will perform a complete full text indexing which may take some time. During this period the application may react slower than usual.
Make sure no other database requires this service to be installed on your instance before you remove the feature.
MS SQL database performance improvements
After you upgrade your repository databases you should run the following script. This will create database statistics based on the actual data in the tables which will help the query optimizer perform better.
USE dbNameHere;

GO

EXEC sp_updatestats;
Advanced upgrade scenarios
Upgrade in a clustered environment
In a clustered environment follow the steps above, but make sure to have all cluster nodes on the same version. You can achieve this by:
-
Stopping all the cluster nodes.
-
Upgrading all the cluster nodes as described above.
-
Re-starting all the cluster nodes.
Upgrade (virtual) hardware
Make sure that you do not connect two iGrafx Platform servers to the same administration database or repository databases at the same time, unless in a clustered setup.
If you want to change the machine hosting the iGrafx Platform you can do this using the steps as described above. Never start the iGrafx Platform application server service again on the old hardware after you started the service on the new hardware.
Make sure to copy the "igrafxdata" folder from your previous base directory to your new application server. The folder contains the information used by the server to connect to the database.
Depending on your situation you might find those articles helpful:
Change database connection without browser access
Connect server to an existing admin database
This article contains