Migrating to the iGrafx platform from Process Central involves the following steps:
-
Verifying your Process Central is recent enough, and error free using the Process Central Server Admin Tool
-
Install the iGrafx Repository Migration Tool.
-
Connect to your existing Process Central Repository with the iGrafx Repository Migration Tool and migrate your repository database to the new format.
-
Create a System User on database, which will be used to connect to the database after you've migrated your repositories.
-
Install the iGrafx platform
-
Register and migrate repositories in the iGrafx platform.
-
Update the iGrafx diagram cache, if required.
These steps are detailed in the sections below.
Considerations
Oracle Databases are no longer supported in Platform version 17.7.0.756 and later. The last version that supported Oracle Databases was 17.7.0.755.
The iGrafx Repository Migration Tool (IRMT) is required to migrate existing iGrafx Repositories to the new format. The migration tool does not alter data in the existing repository*; it performs all operations on a copy of an existing repository. The copy is created to the same database instance. You can move the migrated repository database to any other database instance, if required, using standard database administration tools.
If you are upgrading from a version prior to 15.0 (iGrafx 2013), the pre-requisite upgrade does alter your existing repository - and as such we strongly recommend backing up your repository prior to completing the migration steps.
Each repository will be registered separately in the iGrafx origins platform administration and you can have new or migrated repositories on the same or a different database instance as the iGrafx Origins administrative database.
The IRMT is not required in a new environment with no existing 15.x databases. If you don't have a v15.x repository you want to keep this article is not for you.
Any existing repositories on a version earlier than 15.0 (iGrafx 2013) need to be updated to a 15.x repository using the 15.2.x Process Central Admin Tool following the normal upgrade procedures for the applicable release.
For repositories that are already 15.0 or later - the 15.2.x Process Central Admin Tool should be used to verify that no problems exist with the existing repository prior to migration.
After migrating the database format you can move the repository to a different database server.
We recommend that you test the migration before you shift all clients to the new version, to make yourself familiar with the process. During this test you may ignore the warnings presented during the migration, but you shouldn’t use resulting repositories for a production scenario. For the final migration, we strongly recommend that there are no files and diagrams in a checked-out state, and no users connected to the Process Central repository other than the user you use in the IRMT. Don’t forget to stop the services for WebCentral and MailCentral. The IRMT Upgrade command will check for any of those conditions and issue a warning.
Desktop clients earlier than version 16.0 will be unable to connect to the version 16.0 iGrafx platform repository, and version 16 clients cannot connect to repositories earlier than version 16.0.
A key difference between the version-16.0 iGrafx desktop clients and earlier versions is that beginning with 16.0, users are no longer managed via the database. Therefore you should not assign additional database users prior to the migration other than those required for your administration purposes and the user connecting the application server with the Repository. In other words you need only one database user to connect the database with the application server, normal user shouldn't have a SQL server assignment anymore.
You can install the IRMT on the same machine hosting the database of your Process Central repository, but that is not a requirement.
Step 1. Verifying your Process Central is recent enough, and error free
Using your existing Process Central Administrator tool, check the version of the repository you wish to migrate. This can be done by opening the tool, logging in and selecting the repository.
If the version shown is less than 15.0, you will need to install the Process Central Administrator tool from either Process Central 2013 or Process Central 2015 and perform the repository upgrade. It is recommend that you backup the Repository first - and we strongly recommend consulting with our Professional Services team before proceeding.
If the version shows 15.0, but says that Pagination is required - the Pagination step can be skipped as Step 8 (Update Diagram Cache) will regenerate the pagination data later.
In addition to making sure you're repository has been upgraded to the 15.0 schema - it is highly recommended that you do an Analyze and Fix of the repository prior to proceeding to step 2.
Step 2. Installing the iGrafx Repository Migration Tool (IRMT)
To install the iGrafx Repository Migration Tool, do the following:
You can install the IRMT without installing SQL Server on the same device. You may want to install the tool on computers used to remotely manage iGrafx repositories.
-
Open the iGrafx installation files and browse to the \MigrationTool folder
-
Start the Installation wizard by running the file svsetup.exe.
If you didn’t run the installer as administrator on a Windows Server operating system, you will be asked to confirm the User Account Control (UAC) question to be able to run the installation. -
Click the Next button.
-
Select I accept the license agreement, and click the Next button.
-
Select a destination folder, and click the Next button.
-
Click the Next button.
-
After the installation completes, click the Finish button.
Step 3. Connecting to the Process Central Repository with IRMT
After you have installed the iGrafx Repository Migration Tool, start it, and then follow the instructions below.
The user you use to connect to the database host must have permission to create databases.
-
From the Start menu, run the Repository Migration Tool.
-
Log in to your SQL Server or Oracle database as described below:
-
To log in with SQL Server, do the following:
-
Click the Log In - SQL Server tab.
-
Type a server name in the Server text box, or select a server name from the drop-down list.
-
Select Windows or SQL authentication. If you select SQL authentication, type your name in the Name field, and type your password in the Password field.
-
Click OK.
-
To log in with Oracle, do the following:
-
Click the Log In - Oracle tab.
-
Click one of the following options:
-
Use ODBC DSN – See the documentation that comes with your Oracle ODBC drivers for information about setting up a DSN.
-
Specify Server and Database – This option is enabled if your machine has Oracle OLE DB drivers installed. After you specify a server and database, type your name in the User Name field, and your password in the Password field. The IRMT will then attempt to connect to the specified server using TCP/IP. You can also specify/change the TCP/IP port. The default port for Oracle database installations is 1521.
-
Use Oracle TNS name – This option is enabled if your machine has Oracle OLE DB drivers installed. TNS names connect you to Oracle databases on the network, and are usually set up by your Oracle administrator or by using tools like Oracle’s SQL*Net Easy Configuration.
-
-
Type a User Name and Password.
-
Click OK.
-
Select an existing version-15.x repository.
-
Click the Upgrade button.
-
In the field provided, type a name for the new database.
The IRMT does not upgrade the existing database in place; it creates a new database and leaves the existing, v15 repository untouched.
Step 4. Creating a System User in the Database
Depending on the database system you are using, follow the instructions in either the SQL Server or Oracle section, below.
SQL Server
Open Microsoft SQL Management Studio and create a SQL or Active Directory user. Map this user to the repository database. This user will be used in the iGrafx platform as a a service user for the connection from the application server to the database.
-
Open Microsoft Server Management Studio.
-
Right-click on the Security / Logins folder and select New Login.
-
Add a Windows or SQL Server authenticated user.
-
On the Server Role page, keep the public default role.
-
On the User Mapping page, map the user to the database and assign the following database roles:
-
public
-
db_owner
Or, alternately:
-
public
-
db_datareader
-
db_datawriter
-
db_ddladmin
-
db_executor
You will then need to create the role db_executor since it does not exist by default:
-- Create a db_executor role
CREATE ROLE db_executor
-- Grant execute rights to the new role
GRANT EXECUTE TO db_executor
Oracle
Oracle Databases are no longer supported in Platform version 17.7.0.756 and later. The last version that supported Oracle Databases was 17.7.0.755.
In your preferred Oracle administration environment, create a tablespace for the iGrafx platform. Create a role with the required permissions on the tablespace and grant role permissions for a user you want to use to connect the iGrafx platform with the database.
For Oracle, the iGrafx platform requires a user with the following permissions to the database: CREATE SESSION, ALTER SESSION, CREATE TABLE, CREATE VIEW, CREATE SYNONYM, CREATE PROCEDURE, CREATE SEQUENCE, CREATE MATERIALIZED VIEW, and CREATE TRIGGER.
For a sample Oracle script, see the Database Setup topic of the Installation Guide.
Step 5. Installing the iGrafx Platform
iGrafx Process Central 2015 is over five years old, and future versions of the iGrafx Platform (after 17.7.0.760) will not be able to migrate directly from Process Central. If you are looking to migrate to a newer version of the Platform, you will need to first install 17.7.0.760, and then perform a subsequent upgrade to the newer version after completing Step 7 (Post-migration checking)
For instructions on installing the iGrafx platform, see the applicable articles in the On-premises Installation Guide.
Return to Step 6 when your installation is complete.
Step 4. Registering and Migrating Repositories in the iGrafx Platform
If you used Active Directory users with your Process Central repository and not only local SQL Server or Oracle users, we strongly recommend you import the users from the Active Directory before you run the next steps.
Once the iGrafx platform is installed, you can register and complete the migration to the new repository format, as follows:
-
Access the iGrafx platform in your browser. In the navigation area on the left, click Administration and then click Repositories.
-
On the Manage Repositories page, click the Register Existing Repository button.
-
On the Register Existing Repository page, specify the details for the repository you converted using the System User you created in Step 5. See Managing Repositories for assistance.
-
Click the Register Existing Repository button to register your repository and start the migration wizard. See Using the Migration Wizard in Managing Repositories for details.
Step 7. Post-migration Checking
Once the repository is upgraded, you should check the following sections in the administration area and verify that they look as expected:
-
User Management / Users – Check that the users are mapped properly and they are in the appropriate directory.
-
User Management / Groups – Check that the groups are in the appropriate directory.
-
Security Roles / Item Roles – Check that roles created through the migration wizard are setup properly.
-
Security Roles / Repository Role Assignments – Check the expected groups and users having access to the repository.
-
License / License Assignments – Check that users created during the migration have the required licenses assigned.
In the Model area you should check:
-
Permissions on repository root – Check that users and groups created or mapped during the migration are assigned as expected.
Further to the note in Step 5. - if you were migrating from iGrafx Process Central 2013/2015, having installed 17.7.0.760, you now need to perform the subsequent upgrade to the newer version,
Step 8. Updating the Diagram Cache
Some functionality in iGrafx Origins is available only if the cache for existing iGrafx diagrams is updated. Depending from which exact version of iGrafx you upgraded to iGrafx Origins from, the diagram cache could be up-to-date already or in an intermediate state.
The operation to re-create the diagram cache may be time consuming, depending on the state the repository is in. During the process, every diagram must be accessed and processed by the iGrafx client. Make sure you are logged in as a user with View and Edit permissions to all iGrafx diagrams.
If you are logged in as a user that cannot access all diagrams, or the update process terminates while in progress, or you want to change the cache rebuild level, it is possible to restart the cache update at a later time. The cache will not need to be updated again for any diagrams for which it was updated previously, allowing a sequential re-creation of the cache.
We don’t recommend that you use multiple iGrafx desktop clients to parallelize the re-creation of the diagram cache. Please contact your iGrafx Account Manager if you have performance concerns or want to partially re-create the diagram cache.
Before you start updating the diagram cache, be aware of the following prerequisites:
-
The machine you use to access the iGrafx platform for this procedure must have an iGrafx Desktop Client installed.
-
The user used to rewrite the cache needs to have the following:
-
View and edit permissions to all iGrafx diagrams. If you don’t have such a user, you need to create a temporary user and assign the appropriate permissions.
-
A Desktop Connector or Desktop Connector+ license assigned.
-
To update the diagram cache, do the following:
-
In the browser, access the iGrafx platform.
-
Select the Administration area, then click the Repositories submenu to see a list of the available repositories. An Update Diagram Cache button appears next to each repository for which an outdated diagram cache is detected.
-
Click the Update Diagram Cache button to open the desktop client. An Update Diagram Cache dialog box appears as shown below, with a count of the diagrams in the repository requiring an update.
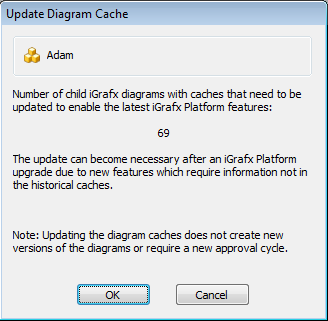
-
Click OK to confirm the update. Another dialog box appears, prompting you to select a rebuild level.
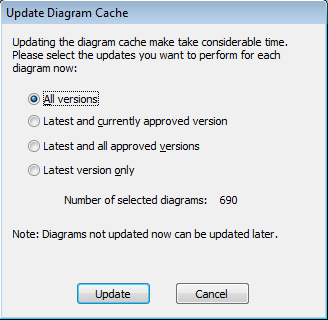
-
Select the rebuild level from the options presented. The "Number of selected diagrams" value changes depending on the level you choose, and reflects the number of diagrams affected by the action.
For example, suppose that your repository has 10 diagrams, each with 20 versions; 5 diagrams are currently approved, and all had been approved once previously. One of the approved diagrams is the latest version; the other 4 have new versions after having been approved. The number of effective diagrams will be
-
All versions: 200 diagrams
-
Latest and currently approved version: 14 diagrams
-
Latest and all approved versions: 19 diagrams
-
Latest version only: 10 diagrams
The cache rewrite will open every affected diagram in the desktop client in order to rewrite the cache for it. This can be very time consuming, depending on the complexity and size of the diagram or the performance of your host and network.
-
-
Click the Update button to begin the cache updating process.