The configuration of 3rd party software i.e. Operating Systems, Databases, Application Server, etc., in the context of this documentation is for illustration purposes only. iGrafx doesn't imply that the provided examples are the best or only way of configuration for the described scenario. Nor can we guarantee that it is the best option for performance and security. You apply the instructions at your own risk, please consult an expert of the 3rd party software if you are not sure.
Before you install the iGrafx platform, you need to do the following database setup tasks:
-
Install Microsoft SQL Server.
-
Create the required databases.
-
Create and map a database user.
These steps are described in the following sections. Some have special requirements depending on the database server you use. The explanations provided here use Microsoft SQL Server as an example.
Install SQL Server
The iGrafx platform runs on any version of Microsoft SQL Server listed on the System Requirements page. Please note that while iGrafx supports SQL Server, iGrafx does not provide technical support for SQL Server products themselves.
Installing SQL Server 2019
Before installing SQL Server 2019, check the system requirements for running it at microsoft.com.
The Microsoft SQL Server installer uses a wizard to prompt you through the installation steps. For setup to continue, you must click the Yes button to accept the license agreement when requested.
For more detailed installation instructions, system requirements, and additional information related to Microsoft SQL Server, see the Microsoft resources that are available on the microsoft.com website or in the Planning section of the SQL Server setup wizard.
To install SQL Server 2019, do the following:
-
Insert the Microsoft SQL Server 2019 DVD or mount the downloaded ISO image.
-
Run the setup.exe program.
-
Click System configuration checker. If the checker reports any issues, it is recommended that you fix the issues before continuing with the installation.
-
Click Installation in the navigation area on the left. The Installation dialog box appears.
-
Click New SQL Server stand-alone installation or add features to an existing installation.
-
Follow the prompts in the Microsoft SQL Server Setup wizard. Note the following iGrafx platform requirements (other configuration options can use the default settings or be configured as desired):
-
On the Feature Selection page, select the following features:
-
On the Server Configuration page, Service Accounts tab, specify the Account Name, Password, and Startup Type for SQL Server Database Engine. The logon Account Name and Password can use built-in system accounts, a local account, local group, domain group, or domain user accounts for SQL Server services. iGrafx recommends assigning the minimum level of user rights available.
Set the SQL Server Database Engine Startup Type to Automatic.
For more information, see the SQL Server Configuration - Service Accounts topic in the SQL Server Books Online. -
On the Database Engine Configuration page, Server Configuration tab, choose Mixed Mode. This enables the Microsoft SQL Server Management Studio to define a local Microsoft SQL server user that can be used to connect the iGrafx platform application server with the database backend. Alternately, you can obtain an Active Directory user or service account from your IT department to use for administration and connecting from the application server to the database server.
Create a Database
iGrafx supports Microsoft® SQL Server and up to and including 17.7, Oracle® servers. For SQL Server, the required steps are summarized above in Install SQL Server.
There are two different types of table structures required by the iGrafx platform: the administrative tables and the repository tables. These two structures can share the same database or can be separated into different databases.
You can also combine multiple repositories into one database. Having repositories share the same database is not recommended in an environment where you require backups of individual repositories, because if you need to roll back to a database backup and you have more than one repository in a database you will restore all of them at the same time even if no restore is required for the other repositories. The ideal scenario depends on your environment and backup requirements. Sharing the same database for multiple repositories is useful if you are not interested in individual backups and want to keep the number of databases as low as possible. Also, if you have only one repository, you may prefer having the administrative tables together with the repository to share the same backup and keep them consistent.
For the best performance and data security, keep the administrative tables and repository tables separate, and avoid having more than one repository per database. All backups should be made on the same schedule, to ensure consistency if a recovery is required.
To create a database, do the following:
-
Open Microsoft Server Management Studio.
-
Right-click on the Databases folder and select New Database.
-
Specify a database name.
-
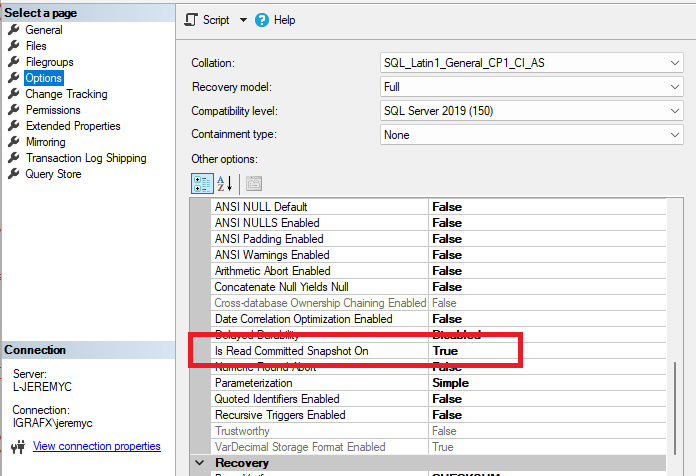
On the Options tab, change the settings to meet your requirements. The recommended collation setting is SQL_Latin1_General_CP1_CI_AS.
If you choose a different collation, please note that a Case Insensitive (CI) collation is required.
-
Change "Is Read Committed Snapshot On" to True (otherwise it could affect the performance of the app)
-
Click OK to create the database.
Create a Database User
To connect the iGrafx platform application server with the database, you need either a local or directory (i.e. Active Directory) user. The roles or permissions required for this user depends on the database version you use.
If you use multiple databases, as described above, you can use the same or separate users depending on your needs.
The Microsoft SQL JDBC driver does not allow the iGrafx Platform to connect to the MS SQL database using a different directory user (i.e. Active Directory user) than the one being used to run the iGrafx Platform service. When configured to use JDBC and a directory user - the sign-in is pass through.
If you plan to use a directory user to connect the iGrafx Platform to the Database and/or Repositories - make sure you create a Database user for the user configured to run the iGrafx Platform service.
Failure to do so will result in the following error getting caught in the igrafx_server.log. "com.microsoft.sqlserver.jdbc.SQLServerException: Login failed for user"
SQL Server
To create a SQL Server user, do the following:
-
Open Microsoft Server Management Studio.
-
Right-click on the Security / Logins folder and select New Login.
-
Add a Windows or SQL Server authenticated user.
-
On the Server Role page, keep the public default role.
-
On the User Mapping page, map the user to the database and assign the following database roles:
-
public
-
db_owner
Or, alternately:
-
public
-
db_datareader
-
db_datawriter
-
db_ddladmin
-
db_executor
You will then need to create the role db_executor since it does not exist by default:
-- Create a db_executor role
CREATE ROLE db_executor
-- Grant execute rights to the new role
GRANT EXECUTE TO db_executor
This article contains