To access the Repository Configuration area, Risks page you must be assigned a Repository Role granting Manage Risk Configuration permission. See Assigning Security Roles for more information.
The Risks page displays multiple settings configurable for a repository.
Risk Types
When users create a Risk object they must specify a Risk Type. A risk can only be of one risk type at a time and the risk type can be changed later.
To define new risk types:
-
Open the Repository Configuration area, Risks page
-
Click the RISK TYPES tab
-
To add a new Risk Type, either:
-
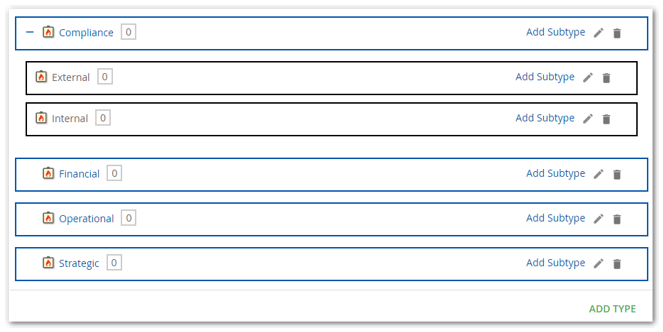
Click ADD TYPE (lower-right of the display) to add a new top-level Risk Type
-
Click Add Subtype on a row
-
-
Enter a Name
-
Optionally enter a non-zero Risk Value.
This number is used to calculate the Inherent Risk Value of a Risk. See Residual Risk Calculation for more information.
Some example risk types:
Risk Instance Types
Like Risks, when users create a Risk Instance object they must specify a Risk Instance Type. A Risk Instance can only be of one Risk Instance Type at a time and the Risk Instance Type can be changed later.
On the RISK INSTANCE TYPES tab, Risk Instance Types are added in the same manner as documented above for Risk Types.
Risk Categories
Risks, Risk Instances, Controls and Control Instances use Risk Categories to further classify the nature of risks and controls. Unlike risk and control types, an object can be in any number of categories or none.
To define Risk Categories:
-
Open the Repository Configuration area, Risks page
-
Click the RISK CATEGORIES tab
-
To add a new Risk Category, click ADD OPTION on a row
-
Enter a Label
-
Enter an ID. The ID is used:
-
In report definitions by the iGrafx Query Language (IQL). See Reporting for more information.
-
In REST API calls for example in custom macros that interface with the Platform
-
-
Optionally enter a non-zero Risk Value.
This number is used to calculate the Inherent Risk Value of a Risk. See Residual Risk Calculation for further information.
Category Warnings:
Because Risks, Risk Instances, Controls and Control Instances all use the same Risk Categories, these settings can be used identify Controls and Control Instances that may be improperly related to Risk and Risk Instances. For example, if a Control has only a "Financial" category and it is controlling a Risk with only an "Operational" category then a warning is displayed on the Risk. See Risks and Risk Instances for more information.
Turn on the Show Category Warnings on Risk Objects switch if you want this type of warning displayed.
Risk Parameters
The Risk Parameters serve two purposes:
-
They help specify the structure of the Risk Matrix (use for Risk Map reports). See below for more details on the Risk Matrix.
-
They specify available settings for Risk and Risk Instance objects
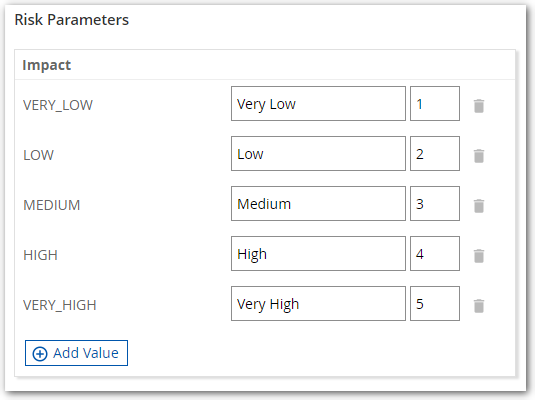
Default definitions for Impact, Likelihood and Appetite are provided in new repositories.
For each row in the below screenshot showing the default Impact settings:
-
The first label is the ID, it is used:
-
In report definitions by the iGrafx Query Language (IQL). See Reporting for more information.
-
In REST API calls for example in custom macros that interface with the Platform
-
-
The second word is the Label used when specifying settings on Risks and Risk Instances and in report Risk Maps
-
The Value number used to calculate a Risk or Risk Instance value and initial Risk Map cell values (see below)
To modify the Risk Parameters:
-
Click Add Value and the delete icon

-
Click SAVE CHANGES
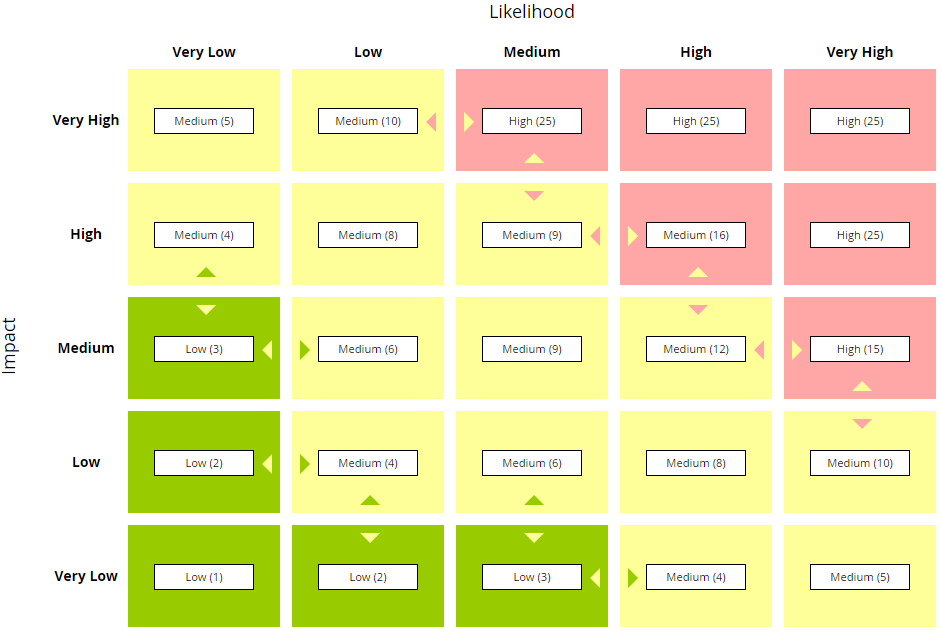
Risk Matrix
This section configures how Risk Map reports are displayed. The row headings, column headings, and initial Value of each cell in Risk Matrix are defined in the Risk Parameters tab. The initial cell Value is the product of the row and column parameter values.
To change a cell Value or Name:
-
Click the cell name
-
Enter a new Risk Cell Name
-
Enter a new Risk Cell Value
-
Click SAVE
The cell color is determined by the cell value and Risk Ranges.
With a repository configured as shown below, a report Risk Map will display a Risk with a Very High Likelihood and Very High Impact in the top-most, right-most cell of the Risk Map.
The Risk Ranges table is used to provide color indicators for Inherent and Residual Risk values. The cell colors of the Risk Matrix are derived by matching the Value with the Risk Ranges table.
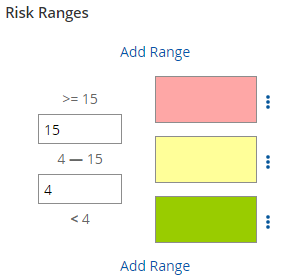
To modify the Risk Ranges, do any of the following:
-
Change the range number fields
-
Click Add Range and enter a new range number
-
Click the 3-dot icon

To modify the color of a range, click the color cell and choose a color.
When finished, click SAVE CHANGES.
This article contains