Navigate the Enterprise Model
The following sections describe how to navigate a repository enterprise model.
Your ability to view and modify repository content is determined by your access rights. See the Licenses vs Capabilities Matrix and Roles and Permissions topics for more information.
The Repository Tree
Click the Hamburger icon 
When you display the Model area, the most recently viewed repository object is selected by default. Repository objects with child objects are displayed with an up or down error. Click the arrows to expand or contract the display.
The repository tree contains two types of root folders:
-
Enterprise Object folders. These root folders are distinguishable by an icon such as a chess piece icon

-
Document folders. Displayed below the Enterprise Object Folders with this icon

Viewing object details
To view repository object details, click the object text label. When selected, the object is highlighted, the tree is expanded or contracted (if the object has children), and the object details are displayed in the right frame.
|
Click the text label to highlight |
A highlighted Object |
|---|---|
|
Here is an example of three repository objects – the
|
When selected, the object is highlighted.
|
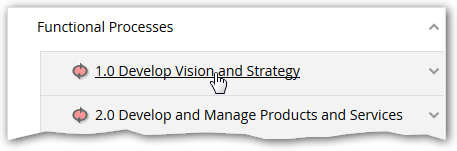
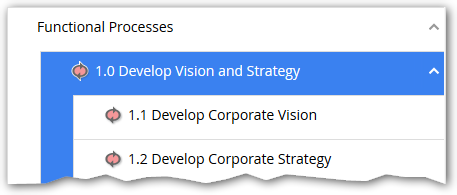
Clicking near a label (and not on it), only expands or contracts the tree (unless there are no child objects). The object is not selected!
|
Click near the label to expand/contract the tree |
Object is not highlighted |
|---|---|
|
|
|

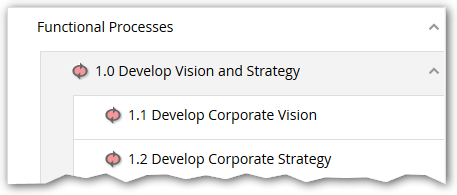
When a tree object is not highlighted, it's details are NOT displayed in the right frame. Instead, the details of the previously selected object remain displayed in the right frame.
Create a repository object
From the repository tree:
-
Click a repository object text label (or folder text label) in the repository tree to highlight the object
-
Click ADD OBJECT at the top of the repository tree
The ADD command is not displayed when some types of objects are selected. These are object types (e.g. Reports) that can't have child objects. -
In the Select drop-down, click the object type you wish to create
-
Click CONTINUE
-
Type a Name
-
Set additional options as desired
-
Click FINISH
Rename, Delete, Move, or Copy a repository object
-
Right-click a repository object and choose the desired command from the context menu
-
Complete the dialog and finish the operation (e.g. click CONFIRM SELECTION)
Delete, Move, or Copy Multiple Objects at Once
The Expand Mode interface provides additional methods for manipulating objects including:
-
Drag-and-drop to move or copy selected objects
-
Move, copy, or delete multiple selected objects
Some operations are not allowed if you don't have the appropriate permissions. For example, in Expand mode, only objects with a Move icon 
To drag-and-drop move or copy one or more objects:
-
Click the Expand button

-
Click the check box

-
Drag and drop the Move icon
-
Click the Collapse button


Hold the CTRL key down while doing the Move to perform a Copy.
The check box is not required when drag and dropping a single object.
There are move and copy restrictions. For example, Resource enterprise objects can't be moved into the Processes folder. Also, you might not have permission to move objects into a destination folder.
To Move, Copy or Delete objects with a command button:
-
Click the Expand button
-
Click the check box
-
With the check box(s) selected

-
Choose a destination and click CONFIRM SELECTION or DELETE
-
Click the Collapse button
Rename:
Rename is not available on multiple selected objects.
Deleing, moving, and copying multiple objects at once is also possible from an object's contains section.
To Move, Copy, or Delete objects from the Contains section:
-
Navigate to the parent of the objects you are managing
-
Expand the Contains section
-
Click the check box next to one or more object names
-
Click MOVE, COPY, or DELETE (located in the bottom right)
-
Choose a destination and click CONFIRM SELECTION or DELETE
Breadcrumbs
The Platform provides breadcrumbs as a navigation aid through the repository tree. You can configure the breadcrumb to display in one of two different formats:
-
Show Ancestors: The breadcrumb displays parents of the current object up the complete tree hierarchy
-
Show Recent History: The breadcrumb displays a history of the last 5 items visited during the current session
The breadcrumb navigation capability allows you to quickly navigate back and forth between previously-visited items or within the full folder structure hierarchy of any given item. This reduces time spent trying to locate a repository item.
Where appropriate, breadcrumb entries can be drag and dropped to the Relationships page, and the Item Properties page to create relationships
To change the breadcrumb format:
-
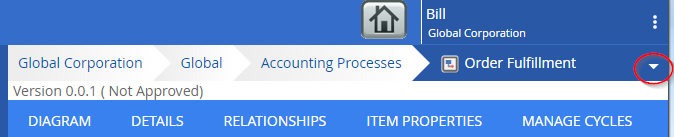
Click a repository object text label
-
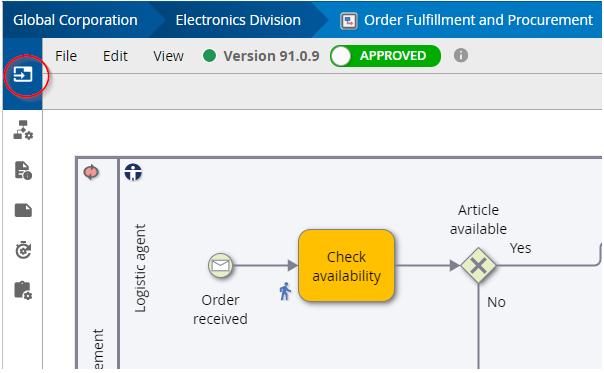
On the upper, right side of the screen, click the drop-down arrow displayed next to the object name (circled below):
-
Choose either Show Ancestors or Show Recent History
To turn Breadcrumbs on or off:
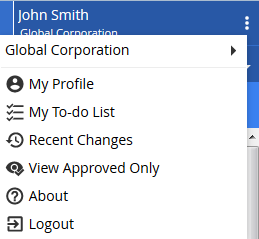
-
Click your login name at the upper-right corner of the Platform
-
Choose My Profile
-
In the "Model Area" section, set the Show Breadcrumbs switch
Viewing Diagrams
Two diagram types may be viewed in a repository:
-
Client-authored: These are created with iGrafx FlowCharter, iGrafx Process, or iGrafx Process for Six Sigma
-
Web-authored: These are created in the Platform with a browser
By default, clicking a diagram name (Client or Web authored) in the repository tree will display the diagram on the right side. If the diagram is not displayed, click the DIAGRAM tab in the right frame.
When viewing diagrams, to display object details, click the Open Object Navigation button (circled below)
Client-authored diagrams are always contained within a .igx repository object representing the document. To view the Client document diagrams:
-
Expand the document object in the repository tree
-
Click one of the child diagrams in the repository tree
Alternatively, after selecting a Client document object, in the right pane, click the DIAGRAMS tab, then click VIEW DIAGRAMS
Overview of Object Details Tabs
Depending on the type of enterprise object selected in the tree view, the resulting enterprise object page will contain a subset of the following tabs. For information on individual enterprise object types, see Enterprise Objects and Folders.
<Object Type> Tab
This is the leftmost tab for all selected enterprise objects. What appears on this tab depends on the object selected.
-
For enterprise objects, Web Diagrams and Client Diagrams, it displays editable Summary, Purpose and Instruction details, the Contains table, Risks, and RACI assignments. For diagrams, a link to the diagram is displayed.
-
For Folders, it displays the Contains table.
SETTINGS Tab
For Resource, Work Product, and Requirement objects, the SETTINGS tab contains editable settings that affect the function of the specific object selected.
RELATIONSHIPS Tab
For all enterprise objects except Folders, Charts, and Tables, relationships are listed and assigned on this tab.
ASSIGNMENTS Tab
For Resource and External Agent objects, the Assignments tab lists Direct Assignments and Assignments from Roles, which you can filter by RACI Assignment type or Object type.
ITEM PROPERTIES Tab
The ITEM PROPERTIES tab lists Standard Properties for the object as well as any Custom Properties that have been defined for it. For more information, see Using Repository Item Properties
MANAGE CYCLES Tab
For Web Diagrams, Client Documents, and External Files, the Manage Cycles tab provides control of the Review, Approval, and Endorsement cycles of the associated diagram, allowing you to schedule and start cycles and assign Cycle Groups specific to a particular diagram.
HISTORY Tab
The History tab reports the version history over the life of the object.
PERMISSIONS Tab
For all objects in the enterprise model, the PERMISSIONS tab lets you view the various effective and explicit Item Role Assignments that apply to the object. You can also explicitly assign roles to an object from this tab.
Changing Repositories
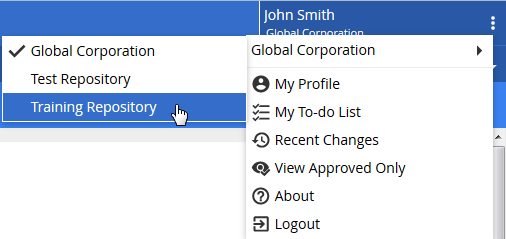
When viewing the Model area, the last repository that you viewed is displayed. If your iGrafx Platform has multiple repositories and you've been granted access rights to additional repositories then follow these steps to change repositories:
-
Click the "More Vert" icon

-
Click the current repository name (e.g. "Global Corporation) and then click an alternative repository name (e.g. "Training Repository" in the below screenshot):
For more information on the enterprise model, see these topics: