This guide applies for customers that are not using the new iGrafx Identity Provider.
You can determine if you are using the new iGrafx Identity Solution by typing in the URL of your iGrafx Process360 Live platform in an anonymous browser window. If you are forwarded to either id.igrafxcloud.com or id.igrafxcloud.eu you are using the new authentication flow. In this case, please contact our Customer Support team at https://echo.igrafxcloud.com to get started on your SSO journey.
What is SAML2?
SAML stands for Security Assertion Markup Language and is used to provide Single-Sign-On (SSO) services to end users. It is used as a data exchange format between Service Providers (web applications that require their users to be authenticated) and Identity Providers (web applications that provide the required authentication). The iGrafx Platform acts as a Service Provider (SP) in this scenario, while your Azure AD, ADFS server or Okta instance acts as an Identity Provider (IDP).
.png?cb=fbf22857a57e86759df89d42c172a8de)
How to set up SAML authentication for your Cloud Platform
-
Create a user in your Cloud Platform with a username that matches the NameID of a user in your Identity Provider (This user will attempt to log into the platform later to test the authentication.).
-
Follow the steps for your Identity Provider (IDP) below
-
You can now test SSO via SAML with your test user
-
Confirm successful authentication and create a ticket in our iGrafx Service Desk to disable form-based login (highly recommended)
-
SSO setup is completed and user import/synchronization is ready to be configured
The configuration of 3rd party software i.e. Operating Systems, Databases, Application Server, etc., in the context of this documentation is for illustration purposes only. iGrafx doesn't imply that the provided examples are the best or only way of configuration for the described scenario. Nor can we guarantee that it is the best option for performance and security. You apply the instructions at your own risk, please consult an expert of the 3rd party software if you are not sure.
Microsoft Azure Active Directory
-
Add the following enterprise application to your Azure Active Directory:
https://azuremarketplace.microsoft.com/marketplace/apps/aad.igrafxplatform?tab=Overview
-
Follow the tutorial: https://docs.microsoft.com/azure/active-directory/saas-apps/igrafx-platform-tutorial
-
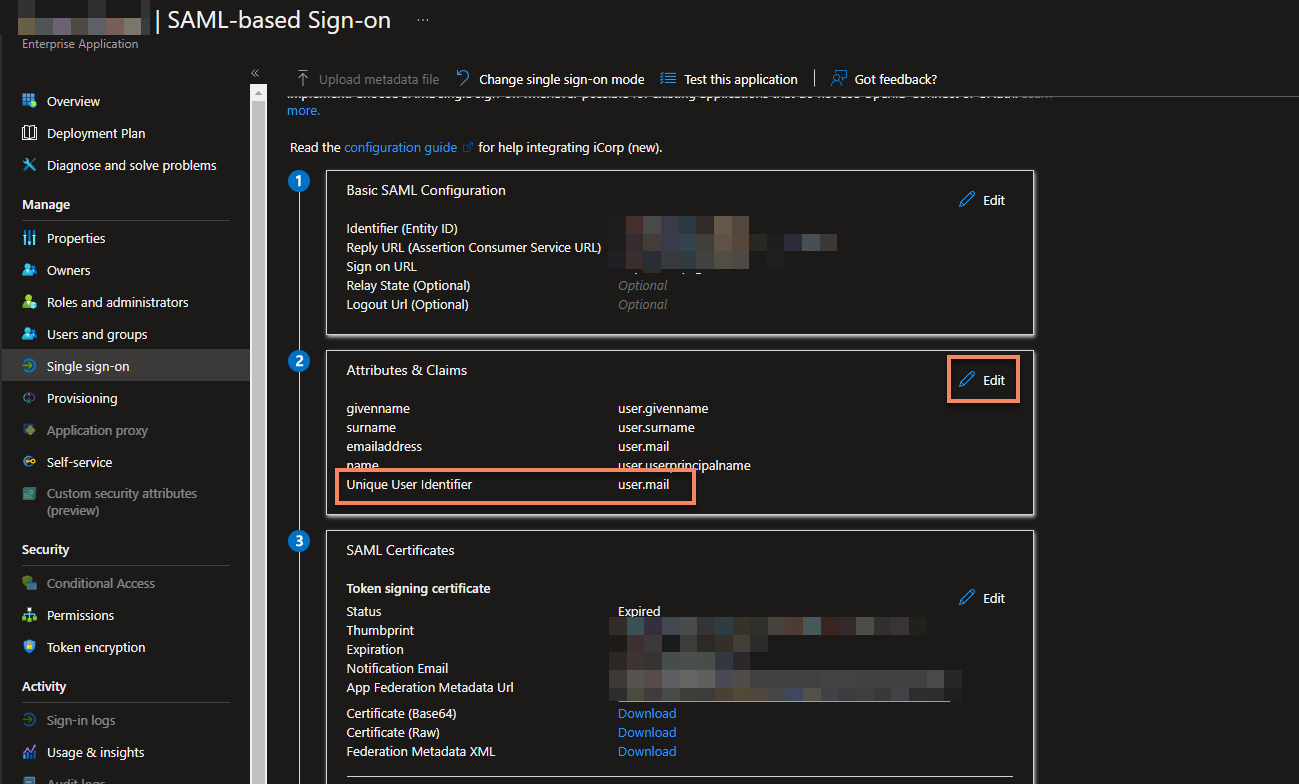
Ensure your
Unique User Identifieris set to the mail attribute in your integration (see below screenshot)
-
Provide the metadata URL by going to
Administration -> User Management -> SAML, and click UPDATE IDENTITY PROVIDER METADATA and follow the options for a metadata URL. -
On the same page, change your NameID policy to Email
-
Verify your SAML SSO flow works by going to the Login page of your Process Design application and clicking
Sign in via SSO
Note: The enterprise application for SCIM needs to be registered separately for now as user provisioning is not supported yet.
Microsoft ADFS Server
-
Receive the
spring_saml_metadata.xmlfile from the iGrafx Team -
In AD FS 2.0 Management Console (in Control Panel - Administrative Tools) select "Add Relying Party Trust". Note: you may need to install Active Directory Federation Services.
-
Select "Import data about the relying party from a file" and select the
spring_saml_metadata.xmlfile you just downloaded. Click Next -
The wizard may complain that some content of the metadata is not supported. You can safely ignore this warning
-
Enter a Display name and click Next
-
Leave "I do not want to configure multi-factor authentication settings for this relying party trust at this time" checked and click Next
-
Leave "Permit all users to access this relying party" checked and click Next
-
On the "Ready to Add Trust" make sure that the tab "endpoints" contains multiple endpoint values. If not, verify that your metadata was generated with HTTPS protocol URLs
-
Leave "Open the Edit Claim Rules dialog" checkbox checked and finish the wizard
-
Select "Add Rule", choose "Send LDAP Attributes as Claims" and press Next
-
Add NameID as "Claim rule name", choose "Active Directory" as Attribute store, choose "mail" as LDAP Attribute and "Name ID" as "Outgoing claim type", finish the wizard and confirm the claim rules window
-
Download your Identity Provider metadata from https://YOUR_ADFS_SERVER/FederationMetadata/2007-06/FederationMetadata.xml.
-
Provide the metadata file by going to
Administration -> User Management -> SAML, and click UPDATE IDENTITY PROVIDER METADATA and follow the options for a metadata file. -
On the same page, make sure your NameID policy is unspecified, unless you have a custom policy in place.
-
Verify your SAML SSO flow works by going to the Login page of your Process Design application and clicking
Sign in via SSO
Okta
-
Go to
Administration -> User Management -> SAMLand clickDOWNLOAD SERVICE PROVIDER METADATA -
With the file on your hard disk, log in to Okta as an administrator, select Admin, select Applications and click Create New App
-
From the list of supported protocols select SAML 2.0 and press Create
-
Define app name (e.g. iGrafx) and optionally define app image and press Next
-
Configure SAML with the following settings:
Setting
Value
Single Sign on URL
https://SUBDOMAIN.igrafxcloud.com/saml/SSO
(use the subdomain that is matching your cloud instance)
Audience URI (SP Entity ID)
Enter the value from the
<md:EntityDescriptor entityID="???">attribute of thespring_saml_metadata.xmlfile you downloaded in step 1Relay State
Leave blank
Name ID format
E-Mail
Application username
Select any of the available options, depending on your requirements.
IMPORTANT: Make sure that the selected usernames will map to login names that will exist in your iGrafx Platform
-
Finish your Okta application creation
-
Optional: Open your application configuration and go to the people page to configure custom username mappings
-
Go to the
Sign Ontab in your Okta application configuration page and download the Okta Identity Provider metadata by clicking on theIdentity Provider metadatalink. -
Provide the metadata URL by going to
Administration -> User Management -> SAML, and click UPDATE IDENTITY PROVIDER METADATA and follow the options for a metadata URL. -
Optional: On the same page, change your NameID policy to Email
-
Verify your SAML SSO flow works by going to the Login page of your Process Design application and clicking
Sign in via SSO
Other Identity Providers
Identity providers like Ping Identity, Centrify, Auth0, HP IceWall, and others are not covered on this page but are also supported, as long as they support the SAML2 standard.
Please refer to your Identity Provider's manual and use the functionality under Administration -> User Management -> SAML to set up your SAML Identity Provider with the Process Design application. Then Verify your SAML SSO flow works by going to the Login page of your Process Design application and clicking Sign in via SSO
Make sure you are using a valid email address as your Unique User Identifier/NameID, or a cloud integration will not be possible.
Debugging
To properly debug SAML authentication issues, go to Administration -> Support -> Logging Settings
Add each of the below logging classes at DEBUG level to your custom logging configuration:
-
org.springframework.security.saml -
org.opensaml -
PROTOCOL_MESSAGE