
Install on Windows v5.9
.Install on Windows v5.9
This documentation is a quick reference for internal usage. Not meant to be given to a customer.
Prerequisites
The following installation procedure assumes that you
have a Microsoft Windows Server available with administrative permissions
have a Microsoft SQL Server available with SA permissions
Install Oracle Java
Go to the Oracle webpage http://www.oracle.com/technetwork/java/javase/downloads/index.html and download the Windows installer for Java SE 8. Make
sure to download the JDK and not the JRE.
Install the JDK and set the JAVA_HOME environment variable to the path you installed the JDK to. It should be similar to: C:
\Programme\Java\jdkVERSION
Extend the PATH environment variable by the path to the bin folder of the JDK installation, it should be similar to: C:\Programme\Java\jdkVERSION\bin
Make sure to separate the additional path element with a semicolon from the already existing path entry.
Database creation
The database used to automate processes should be separated from the database used for the iGrafx Platform repository. The following steps guide you
through the steps to create the database and configure it appropriately for the use of the process automation component.
Create a new Database in your Microsoft SQL Server instance
SQL_Latin1_General_CP1_CI_AS
if the above isn't available use this alternative: Collation Latin1_General_100_CI_AS
Installation of iPA server
Quick Tutorial
Following quick steps can help you through a simple installation.
Unpack
Zip file extracted into
C:\Automation
which will create a folderstructure looking like this:
C:\Automation\jboss-eap-7.2\standalone\
If this is not the case adjust the folder structure to match the sample. If this is not possible adjust the properties files in the standalone/configuration folder.
SQL Database
New Installation
Run the scripts 1 to 4 for the initial setup
Run the update scripts in the C:\Automation\Installation\1 SQL Scripts folder
Update from Earlier VersionsDo NOT run scripts 1 to 4 in this folder.
Run the update scripts in all folders for versions newer than the one you currently have installed.
Configuration of property files
Adjust the DB configuration and host name/IP where applicable in the following files:
C:\Automation\jboss-eap-7.2\standalone\configuration\ACM.properties
C:\Automation\jboss-eap-7.2\standalone\configuration\cba.properties
C:\Automation\jboss-eap-7.2\standalone\configuration\CMD.properties
C:\Automation\jboss-eap-7.2\standalone\configuration\tim-cba.properties
C:\Automation\jboss-eap-7.2\standalone\configuration\standalone.xml
In the standalone.xml file you have to change the DB configuration but also the binding parameter to match the IP address of your machine. You can
decide to leave this on localhost until after the test run, but to make the machine publicly available this parameter has to be changed.
Updating to 5.10.x+
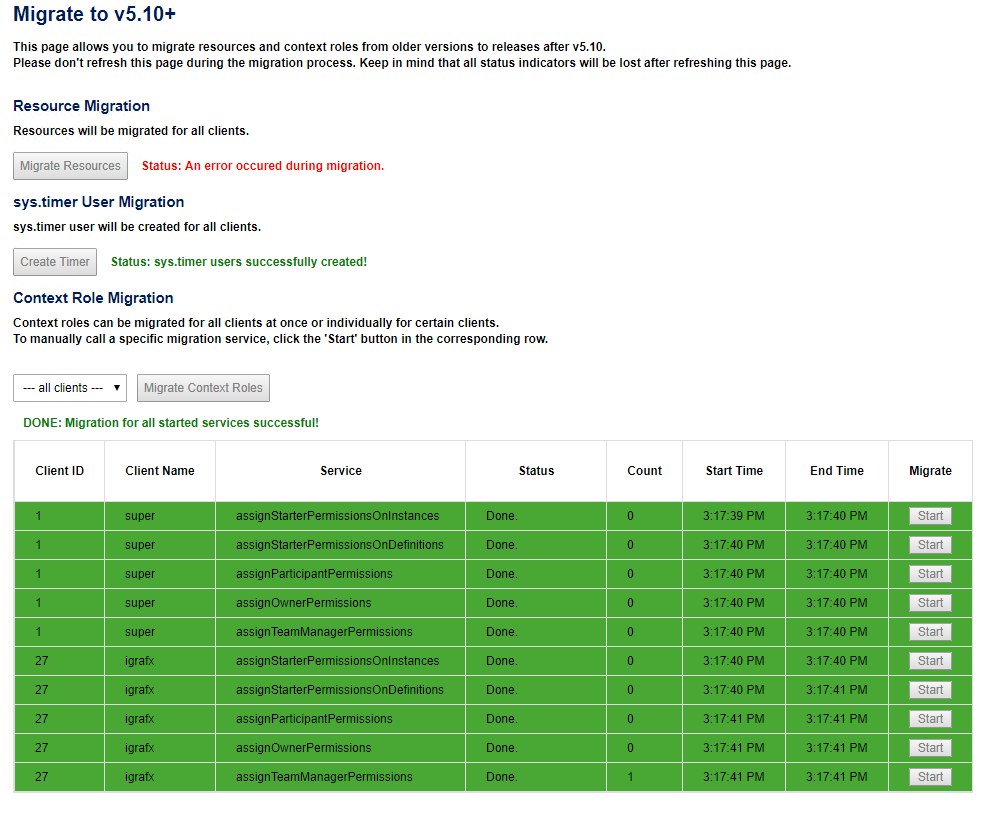
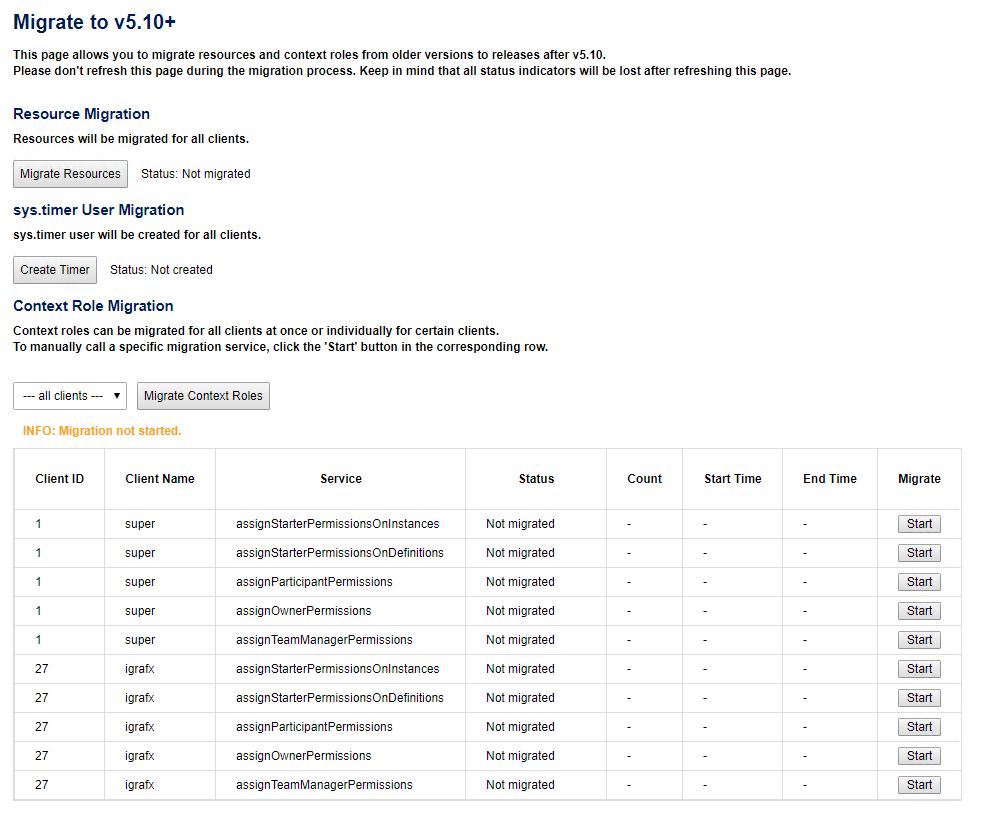
On update from older versions make sure to use the page 'loom-portal/migrate.htm' to migrate from the previous version. Before migrating the DB, the
license needs to be installed - otherwise migrate.htm will give a login error.
The login dialog looks like this:
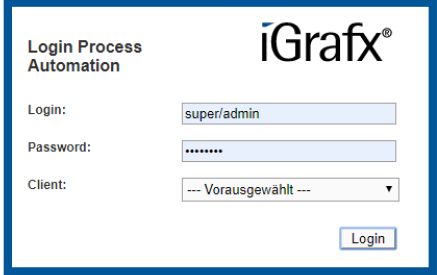
Do leave the "Client" selection unchanged!
Temporary note, it showed 'not migrated" despite that I was doing a fresh installation. Running it resulted in one error:
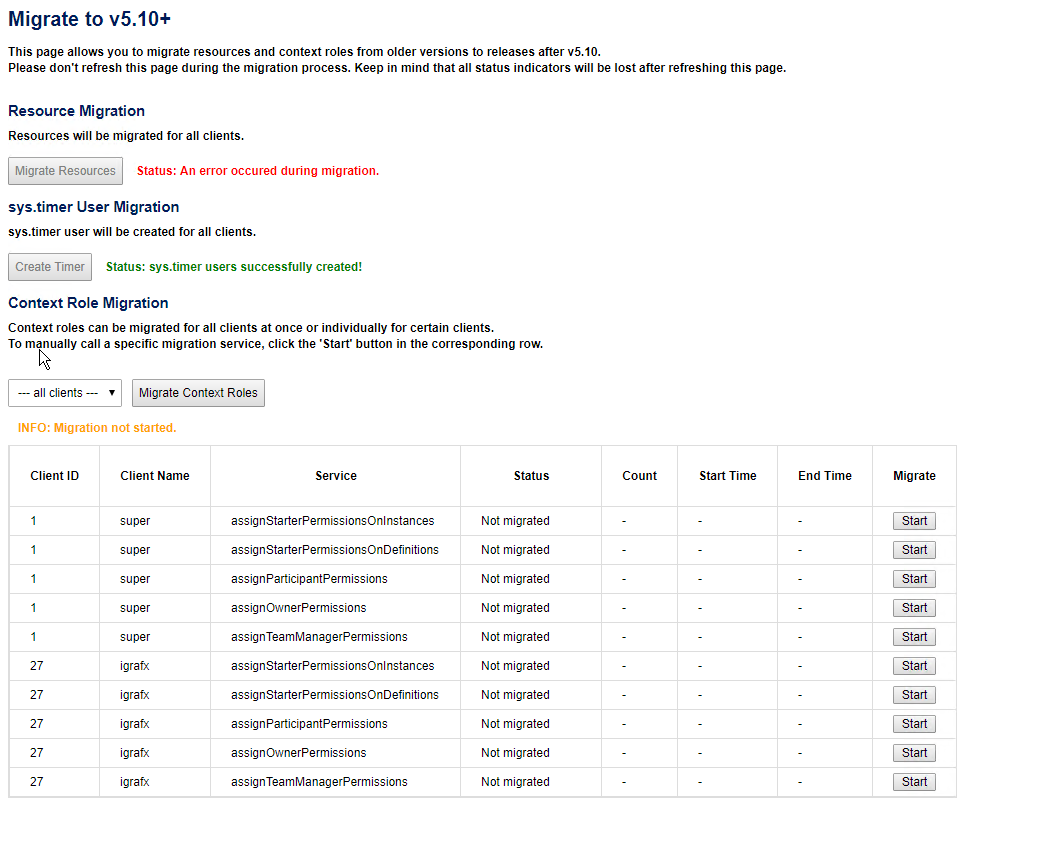
Logfile shows:
2019-08-14 22:17:07,00160 ERROR [org.jboss.as.ejb3.invocation:77] [STGK5zLIz63N] [admin] (default task-3) WFLYEJB0034: EJB Invocation failed on
component ResourceManagerImpl for method public abstract java.util.Map com.dooris.resource.beans.ResourceManager.
convertDeprecatedContentOfResource(): javax.ejb.EJBException: com.dooris.bpm.exceptions.GenericException: Something went wrong while database
search of resource contents for migration. Maybe there is no old content to migrate
I guess that indeed there was no content to migrate, no idea why it says "Not migrated" though. that made me think I have to migrate.
Test run
Run web server via console
C:\Automation\jboss-eap-7.2\bin\standalone.bat
Access the server from the local machine.
http://localhost:8080/loom-portal
You need to adjust localhost to the address you specified in the binding parameter of the standalone.xml file.
** See "Additional Notes by Chris Palmer" for more information about Port numbers.
Firewall
Create a firewall rule and allow jboss default port 8080 to be accessible from the outside.
** See "Additional Notes by Chris Palmer" for more information about Port numbers.
Local Service
Open a command line window. Make sure you open it as administrator!
Go to C:\Automation\jboss-eap-7.2\bin and run:
service.bat install
Open the local services management window and go to the service "iGrafx Automation", change the start type to automatic and start the service manually.
Initialize DB from the application
Access http://hostname:8080/loom-portal/init/InitDB in a browser.
The expected result is a clean white page. In case of an error the error will be displayed on screen and written to the log file.
Starting with version 5.10.5, initializing via /init/initDB throws an error. The working method for initializing the database is to navigate to http://hostname:
8080/loom-portal/hidden.htm and start the initialization process from there.
Upload License File
http://localhost:8080/loom-portal/license.htm
Login as: super/admin
Password: t1m5up3r
Paste the content of the license file in the text box.
Setting up SSL
Certificates for SSL are located in c:\Media\ssl\<date>. Unfortunately the certificates we receive from GoDaddy are not in a format that can be directly used
in JBoss and need to be converted.
Add the CACert certificate to the Java CACerts store and to JBoss's truststore using keytool
keytool -import -file c:\media\ssl\<date>\CACert.cer -keystore c:\Program files\Java\jdk1.8.0
_201\jre\lib\security\cacerts
keytool -import -file c:\media\ssl\<date>\CACert.cer -keystore c:\Automation\jboss-eap-7.1.0
\ssl\truststore.jks
The default password for both stores is changeitConvert the pfx certificate:
Install the pfx certificate in Windows by double-clicking it. When prompted, enter the password from pfx_password.txt in the same folder. Make
sure the options "mark as exportable" and "include all extended properties" are checked, leave all other options on default
Open certmgr.msc and open the folder "Personal > Certificates". You should see a wildcard certificate named *.igrafxcloud.com
Right-click this certificate and select "All Tasks > Export"
Check the option "Yes, export private key"
On the next page, select PKCS #12 (should be selected by default) and make sure the options "include all certificates from path" and "export all
extended properties" are checked
On the next page, set a password for the certificate
Save the file to c:\Automation\jboss-eap-7.1.0\standalone\configuration
This step needs to be repeated every time our certificates expire and need to be renewed.Edit the following lines in standalone_igrafx.xml:

Replace "keystore.pfx" with the filename you used when saving the exported certificate, and "changeit" with whatever password you used.


Restart igrafx automation service
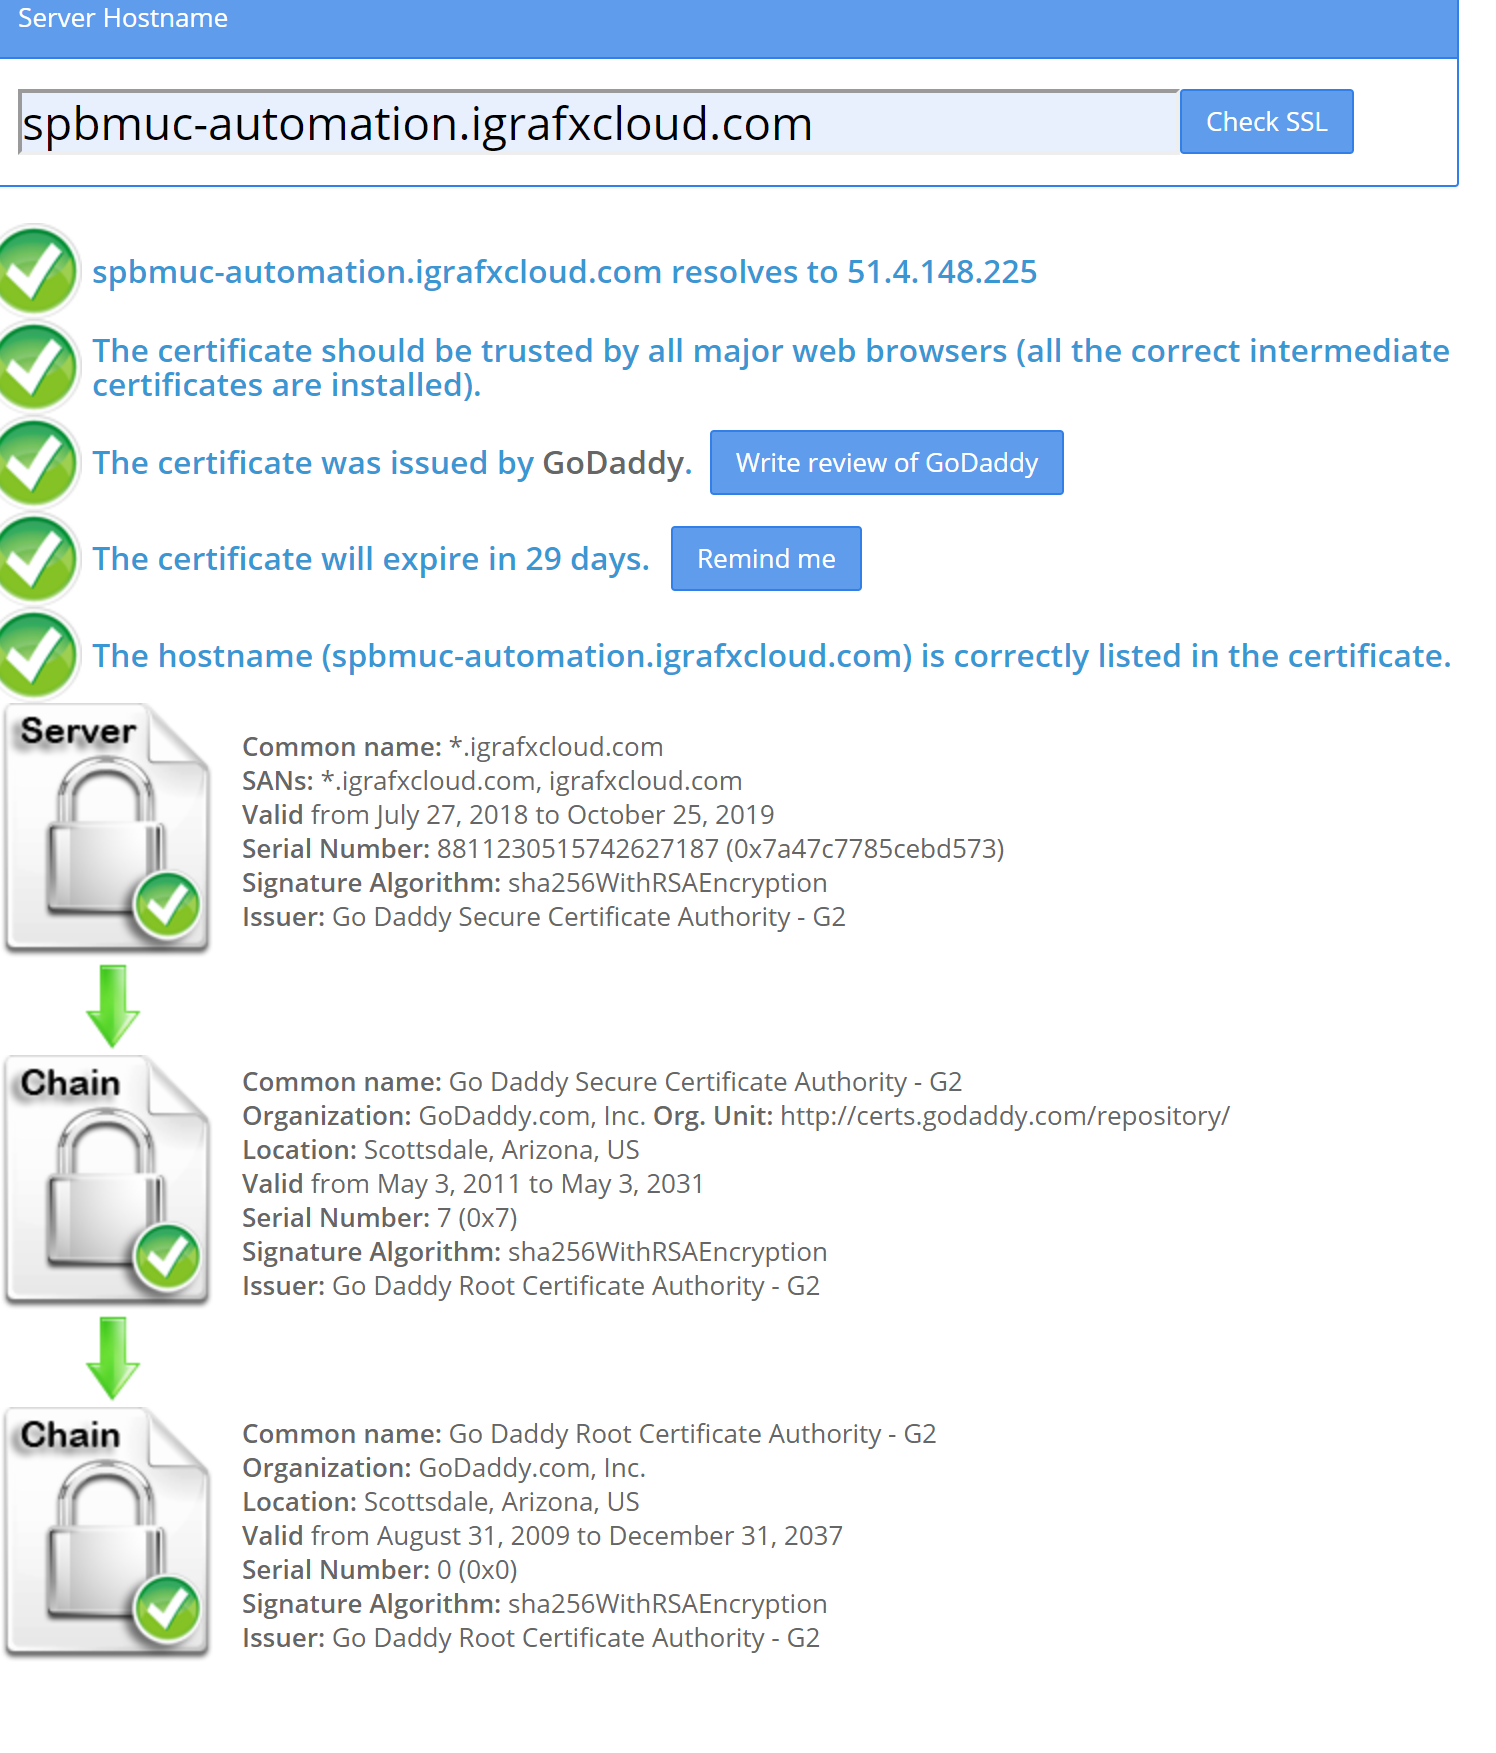
Check SSL configuration by going to https://www.sslshopper.com/ssl-checker.html. If all went well, the output should look like this:
Configuration in browser
Access http://hostname:8080/loom-portal/
Login as: super/admin
Password: t1m5up3r
Client: Administration Client
Right click on Roles, "Create System Role", name it: resource-manager
Right click on Users, "Create User"
Configure the user and assign all of the following roles:
administrator
member
resource-manager
super
Set a password for the new user.
Right click on root, "Create Client" and name it igrafx (all lowercase). Do not use the customer name or anything else, if you do the jboss configuration
need to be adjusted!
Save and close user window. Log out of the admin client.
Login as: super/username
Password: yourpassword
Client: Administration Client
Open the tab TSS-Resources.
In the drop downs make the following selections and upload the appropriate files via the button on the table which will appear once the dropdowns are
selected:
Application: CFG
Dokumententyp: Konfigurationsdatein
File to upload: cfg.config
Application: CFG
Dokumententyp: CSS-Dateien
File to upload: cba.css
Application: CFG
Dokumententyp: Logo-Dateien
File to upload: logo.png
Application: CMD
Dokumententyp: Konfigurationsdatein
File to upload: CMD.config
Application: TIM-Smartform
Dokumententyp: CSS-Dateien
File to upload: cba.css
Configuration in Database
Open the database in SQL Management Studio
Table ACM_APPLICATION change the names from TIM Smartform ... to iGrafx Smartform ...
Test
Deploy a test process to:
http://hostname:8080/loom-portal/Deploy.iGrafx
Check in the smarform repository the process appears and the smartform editor opens.
Configure users
For customer installations it is very important to create a second tenant.
This will then be the tenant that we pass on to our customers.
open the administration client with the super/admin user
right click on root and choose create tenant.
create a tenant with name=customer name
sometimes we create a second tenant with the name=customer name-test
This is very important because the super/admin user is a user for administration. Some tasks are not possible for this super/admin.
Open the administration client for the igrafx clilent created above and create the required users and groups.
Login as: admin
Password: t1m4dm1n
Client: Administration Client
The default password for new users is: task!nmotion
Change system user passwords
To be able to change the password of admin users you need to change the SystemIdentity value to 0 in the table loom_identity with the username admin
in the Name_ column.
Configure timers and everything else
Basic configuration is done now. You most likely want to configure appropriate DNS entries and reverse proxies etc, which goes beyond the scope of the
quick tutorial to setup the automation server.
You can now add the required timers or hook up Active Directory synchronization and authentication if required.
Additional Notes from Chris Palmer
I was unable to use port 8080 as it was already being used. Keep this in mind as you could run into port conflicts. I changed mine to port 9090
instead and it worked fine.
Make sure to look to the "System Requirements Automation" page in the iGrafx Platform guide. This will tell you what version of Java you need to
install. I updated the version in this document as of 09/29/2020, but they can change in the future.
Alternatively the guide as PDF: RUN-.InstallonWindowsv5.9-250424-0429-4.pdf