Repository Overview
An iGrafx Platform repository is a Business Process Management (BPM) storage system. You may think of it as a library to categorize, find, and control the processes and process-related information within your enterprise. The iGrafx products provide powerful solutions for general process improvement methodologies, as well as specific methodologies such as Six Sigma, ISO 9000, Lean, and IDEF0.
Key Benefits
A repository allows your enterprise to work together as a team to manage (visualize, model, simulate, optimize, and organize) your processes. Some key repository benefits are:
-
Central Storage and Access Control: Allows easier access and maintenance of process, and process-related information. Prevents unauthorized use.
-
Versioning and Audit Trail: Document and understand how your processes have changed, and be able to use prior versions if necessary.
-
Cycle Management Procedures: Ensure that the processes you're controlling have been reviewed, approved, and/or endorsed for use by your enterprise.
-
Powerful Query (Searching) Capabilities: Easily find the process information you need.
-
Web Access: Easily share processes across the entire enterprise; anyone with a Web browser and appropriate access can see and annotate information stored in the repository, & participate in cycles.
-
Collaboration and Consistency: Check out single diagrams within an iGrafx document, link to or share common information, and use a consistent set of enterprise definitions across your organization.
-
Link Management: When items are renamed or moved within a repository, all links are automatically maintained.
Product Architecture
An iGrafx repository manages items, diagrams, and documents created by any iGrafx Platform or Client application, including iGrafx FlowCharter, iGrafx Process, and iGrafx Process for Six Sigma. You may also store non-iGrafx files, such as Microsoft® Word files, Adobe® Acrobat® PDF files, and any other file in the a repository.
Repositories in the iGrafx Platform are accessible via the web. For example, you do not need iGrafx products installed on your machine to view (read) and annotate diagrams created with the iGrafx Platform or iGrafx Clients.
Only deliberate changes to repository items are possible. The method for changing items differs depending on whether the item is a repository object, web diagram, Client document, or non-iGrafx file.
The relationship between iGrafx Platform, Client tools is depicted on this page {{ ADD LINK HERE }}
Opening the Training Repository with your Browser
You may have one or more repositories defined for use in the iGrafx Platform. Your System Administrator will have enabled which repositories are available to you. In order to use a repository, you must first open it.
This guide, however, is written specifically for use with a Training repository provided by iGrafx.
Perform the following steps:
-
In your browser address bar, enter the URL provided by your iGrafx instructor or company training administrator.
-
Enter your provided Username and Password and then click Login.
-
In the left frame, choose the Model area

-
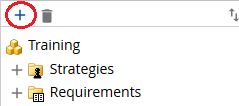
The "Training" repository, as shown below, should be displayed.

Creating Repository Structure
Any repository, or library, of information needs a system of cataloging objects so that it may be found and managed easily.
Your organization have more than one repository defined within the iGrafx Platform; potentially with an initial structure based on your company's needs created by your Administrator. Depending upon the level of detail each repository attempts to encompass, you may need to create additional structure within the repository for your information.
For example, in this training class we assume a single, global repository that is shared with your fellow students. You will create a repository folder for your work. Within that folder, you can create additional folders as desired.
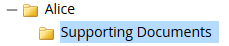
Create a Folder {{ Also create the Supporting Documents folder under "Alice" }}
Follow these steps to create your folder in the Training repository:
-
In the Model area
-
In the right frame, click "Folder" and enter "your name" (e.g. "Alice") for the Name.
-
Click

For this training class, you will perform actions that you may not have to do in your production environment. For example, instead of creating a folder for your own work, in your production environment you may be placing your documents in folders created by someone else, or even simply be viewing and approving documents.
Managing Web BPMN Diagrams
In order to edit a web BPMN diagram, you must first check it out. For example, if you want to add a sub-process to an existing process diagram, you must check the diagram out of the repository first. Once you've checked out an item, no other users may check it out to edit it, nor check in a newer or different version. Other users may, however, still view a read-only copy of the diagram. When your modifications are complete, check in the diagram to create a new repository version.
The next section assumes that you have created a new web BPMN diagram.
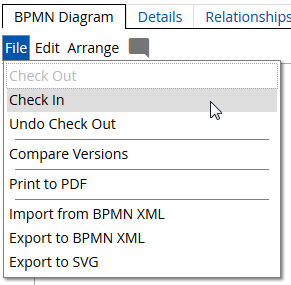
Check In
You've completed your Web BPMN diagram edits and are ready to Check In (save) changes into the repository. This will create a new version of the diagram while retaining older versions for viewing if necessary.
-
In the top frame, click "File" and then choose "Check In":
-
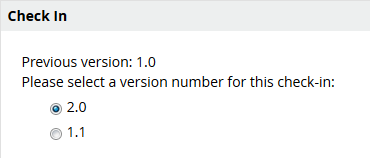
Leave the suggested version number selected. iGrafx has configured the Training repository to have two parts in the version number. Your administrator can configure your repository to use 1 to three parts and the administrator can define the default part to increment on check in.
-
There may be Custom Properties displayed in the Check In page. Those will be discussed later. For now, leave any Custom Properties blank or with their default value set.
-
Optionally add a Comment
-
Click

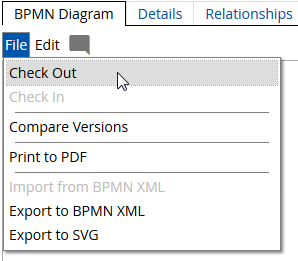
Check Out
Use the "Check Out" command to modify existing Web BPMN diagrams.
-
In the repository tree, select the repository item
-
Click "File" and then choose "Check Out"
Undo Check Out
If you have not modified a file that you checked out, or do not want to check in changes you've made, you may wish to undo (cancel) the checked out status of the item.
-
In the repository tree, select the repository item and choose the Details tab
-
Click

When you undo the check out of an item, you will lose any changes you have made after you checked the item out. iGrafx will warn you of this potential loss of changes.
Managing External (non-iGrafx) Files
Like web BPMN diagrams, external (non-iGrafx) files are updated with check in and check out commands. In addition, external files are managed in the repository with upload and download commands:
-
Upload External File – to add an external file to the repository
-
Download File – to open an external repository file
-
Upload a New Version – to create a new version of an external repository file
Adding External Files to a Repository
One of the main advantages of a repository is enabling a mechanism for sharing and managing information, and the control over information itself. In addition, classification of documents at the time data is published, or a change is made, allows easier reference of, and control over, the documents.
You may add files to the repository that are not created by iGrafx. For example, you may have a word processor or presentation type document that you wish to link to from your diagrams. You may also have other types of files you wish to control and access through a repository.
Add an external file to the Training repository:
-
With Microsoft Office, create a Word document named "Document.doc" on your hard drive
-
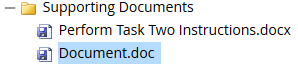
In the repository tree, click the "Supporting Documents" folder under the folder named after you
-
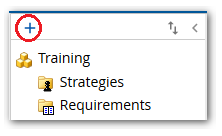
Click the "+" icon at the top of the repository window
-
In the right frame, click "External File" and click

-
Navigate to the "Document.doc" file on your hard drive and select it
-
Click Open
-
Do not change the suggested version number (e.g. "1.0")
-
Edit the Comment, Summary, and Purpose fields as desired
-
Click

Creating new Versions of External Files
There are two methods for creating new versions of external files:
-
Check Out followed by Check In
-
Upload a New Version
The first method ensures that only the user who has the external file Checked Out can Check In a newer version. The second method performs an automatic Check Out and Check In of the file with a single command. This method is not available to a user if another user has the external file Checked Out.
Check Out followed by Check In
-
Select the repository Document.doc file:
-
In the External File tab, click

-
Save the file to any location on your computer
-
In the External File tab, click

-
Edit Document.doc in Word and then close and save the file
-
In the External File tab, click

-
Click
-
Edit the Comment, Summary, and Purpose fields as desired and click

Upload a New Version
-
Select the repository Document.doc file:
-
In the External File tab, click
-
Save the file to any location on your computer
-
Edit Document.doc in Word and then close and save the file
-
In the repository tree, click Document.doc and click

-
Click
-
Edit the Comment, Summary, and Purpose fields as desired and click
Viewing Repository Items
If you simply want to view a repository item, instead of checking out that item for editing, you may view the current version of the item.
-
Select a repository item:
-
-
To view a diagram, choose the Diagrams tab
-
To view a non-iGrafx file, choose the External File tab and then choose
-
Viewing Item History
To view the summary of change history for a diagram or document:
-
Select a repository item
-
Choose the History tab
Viewing a Historical Version of an Item
To view a read-only version of a historical version of an item:
-
With the History page visible, click View (to the right of the version number) for the version you wish to view
Creating Shortcuts
Given the proper permissions, you can create shortcuts from a repository folder to an item (document) in the repository, To create Shortcuts:
-
Select a repository folder
-
Choose the Folder tab in the right frame and click

-
Click the Shortcut button

-
Select the item you wish to make a shortcut for
-
Click

Copying Repository Items (Disband Shortcut)
If you want a copy of a repository item, create a Shortcut (as documented above) and then 'disband' the Shortcut:
-
Create a Shortcut
-
Select the Shortcut in the repository tree
-
Choose the Shortcut tab in the right frame
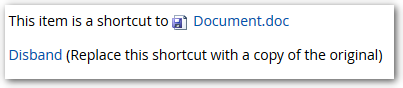
-
Click Disband and then click

Searching for a Repository Item
The search feature will look for any repository items matching the search term. This includes diagrams, enterprise objects (e.g. Resources) and external (non-iGrafx) files. After performing an initial search, you'll have the opportunity to refine the search to specific object types.
To perform a Search:
-
In the top left frame of the iGrafx Platform display, type the search term in the Search box (e.g. "Transfer") and then press Enter or click the

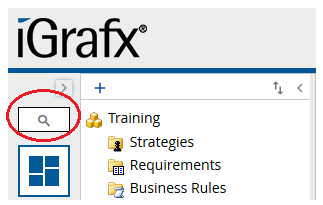
The search should find the "Transfer Funds" diagram.
Maintaining Repository Content
As you work with a Repository, you may wish to maintain or update the content. Typical operations are renaming items, or changing (moving) where items are stored.
You may also remove (delete) items from the repository, though this is not common and must be carefully considered.
Renaming Items in the Repository
Follow the steps below to change the name of the "Document.doc" item in the Repository. It is important to keep the file extension (e.g. '.doc') in the name, otherwise the file may become unusable because the operating system will not know how to open the file.
-
Select Document.doc in the repository
-
Near the top of the right frame, click the pencil button next to the item name

-
Rename the item to "Order_Taking_Info.doc" and click

Note: When a repository item is renamed, all links are properly updated.
Moving a Repository Item
You may decide that you want to move an item within a repository after you've added it, or move the item to a different repository entirely. You must have the proper permissions to move items.
To move items between folders:
-
At the top of the repository tree, click the "Tree Move Mode" button
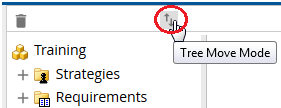
-
Drag and drop items with the

-
Click the

To move items within a folder (reorder):
-
Select a folder containing items to reorder
-
Choose the Folder tab and then click

-
Drag and drop items with the
-
Click

Deleting a Repository Item
Please be aware that deleting an item from the repository cannot be undone. Deleting repository content should only be done with the utmost care, and only when absolutely necessary; as you will be deleting the item for everyone who uses the repository, and deleting all versions of the item.
To delete an item from a repository:
-
Select the repository document or file that you wish to delete
-
At the top of the repository tree, click the trash can icon
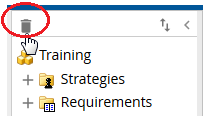
A confirmation dialog is displayed.
Adding Repository Resources
If you have the proper permissions, you can create objects in the Repository Resources folder. The resources can be related to each other (e.g. "Jane" is responsible for the "Accounting" role) and the resources can be related to diagram elements (e.g. Lanes and Pools).
When a Lane or Pool is labeled with a repository resource, if the resource name changes, then the diagram element is automatically updated to display the new name. See the Using Hints to Label Lanes section for instructions to label a diagram element with a repository resource name.
Because repository resources are shared by all users, the properties of each new resource should be carefully planned. This includes the name, resource type, and location within the resources folder.
To add a new repository resource:
-
Expand the Resource folder by clicking the plus icon
-
Expand existing folders and/or resources and select the folder or resource where you will add a child resource
-
Click the + icon at the top of the Repository tree
-
In the right pane, click Resource
-
Enter a Name, specify a Resource Type, and enter a Summary
-
Click
Repository Item Permissions
The iGrafx Platform controls actions and access to repository items based on role and user license assignments. A role is a list of access permissions to take some action on an item. Roles are assigned to users and groups for each item and folder in a repository.
If you add an item to a repository, you are the Administrative Owner which includes the Administer permission for that item. If a user with Administer permission changes role assignments on a parent item (including the repository root) then those assignments are inherited by children of the parent. You must have Administer permission for an item to change its role assignments.
This guide assumes that the default role definitions are available but the defaults can be modified and supplemented by your repository administrator.
License assignments and the permissions associated with each role are managed by your administrator and not covered here.
Assign Roles
After adding a document or file to a repository, use these steps to assign roles to an item. In this example, the user "John Wayne" is assigned the Author role for a document. Try the following steps with a user available on your installation.
-
Select "Our Process" diagram in the repository
-
Choose the Permissions tab
-
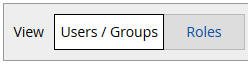
In the View bar, choose "Users / Groups". By default, there are no users or groups assigned roles for this document. Because you added the document, you are the Administrative Owner
Note: Assignments can also be created when viewing Roles
-
Click

-
Click to select one or more users and groups. Selected users and groups are highlighted with a check mark and green:

-
Click

-
Select one or more Roles to assign to the previously selected users and groups. For example, click Author then click

-
The role assignment is displayed:

View Effective Permissions
Item user permissions are determined by user licenses and role assignments on the item and its parents. There can be multiple license and role assignments that set the eventual permissions. The "View Effective Permissions" command displays license status, role assignments and their effect on permissions. Use the "View effective permissions" command to understand the permissions you or others have for a specific repository item.
To view effective permissions for an item:
-
Select the "Our Process" diagram in the repository
-
Choose the Permissions tab
-
If you don't have administer permission for the selected object then the effective permissions are immediately displayed when viewing the web Permissions page. Otherwise:
-
Under "Item Role Assignments", click

-
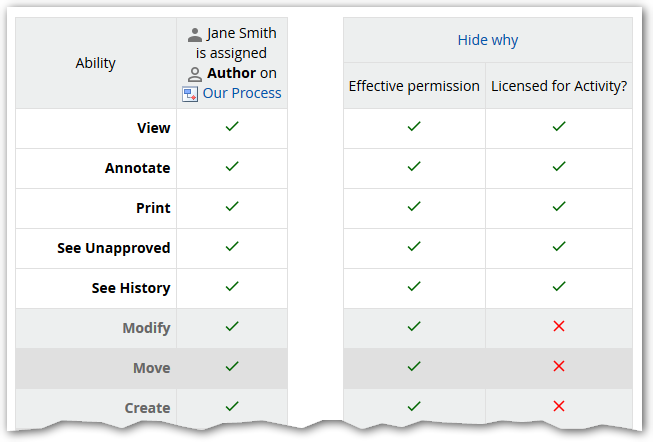
From the drop-down list, choose the "Jane Smith"
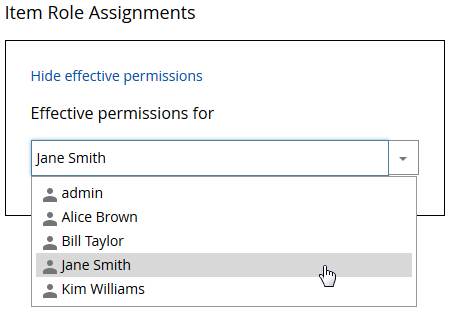
-
The user's effective permissions are displayed
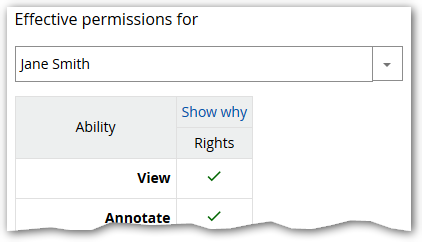
-
-
To see how the permissions were determined, click "Show Why"
-
Role assignments to the selected item and/or its parents are displayed. The cumulative permission is displayed in the "Effective permission" column. In this example, Jane Smith has permissions to modify the diagram but she doesn't have the appropriate license to modify it. That is because Jane has only been assigned a User license instead of a license that enables edits to web diagrams. See your Administrator if you believe that you have incorrect licenses assigned to you.