Managing Email
Email Management includes email server configuration settings and email templates, which are described in the following sections.
Email Settings
The Email Settings page lets you turn notifications from the iGrafx platform on or off, specify outgoing email and server settings, and test the configuration with a specific email address.
To access your settings:
In the Administration area, choose Email Management
In the right pane,, click the EMAIL SETTINGS tab
Be sure to save any changes by clicking the SAVE EMAIL SETTINGS at the bottom, right of the page.
Email Notifications
Use the Email Notifications switch to turn email notifications on or off for the entire system.
Outgoing Email Settings
These settings specify the sender name, address, and a subject line prefix for mails generated by the iGrafx platform.
Sender Display Name: The name displayed for the sender. The default value is "iGrafx Platform".
Sender Email Address: The address that will appear in the email "From" field. Whether this address must actually exist depends on your mail server, but if not, you should still use a value that takes the form of a valid email address, such as noreply@ourmailserver.com.
Subject Prefix: The text specified here appears at the beginning of the Subject line. The default value is "[iGrafx Platform]".
Server Details
Set these fields to match your mail server's configuration.
SMTP/JNDI: Select SMTP to use a SMTP mail server directly, or select JNDI if you want to use a JNDI location that's configured for your SMTP server. If you select JNDI, a JNDI Location field replaces the SMTP configuration settings. Specify a valid JNDI location there.
Use SSL: Use this switch to turn Secure Sockets Layer encryption on or off for messages sent from the iGrafx platform.
Use TLS: Use this switch to turn Transport Layer Security encryption on or off for messages sent from the iGrafx platform.
Host Name: The name of the SMTP mail server.
Port: The UDP port to use for sending emails, set to 25 by default.
Authentication: Specifies the authentication method used to connect to the mail server. The default setting is Anonymous.
Credentialed: Selecting this option displays the SMTP Login Name and SMTP Login Password fields. Enter credentials that are valid for the specified mail server.
Microsoft Exchange Online: Selecting this option prompts you to enter your application’s Client ID, Client Secret, and Tenant ID. Setup guide.
Test Configuration
Before saving your settings, we recommend testing your current SMTP or JNDI settings by specifying a valid email address in the Test Email Target Address field, and then clicking SEND TEST EMAIL.
If the test is successful, the following message appears: "Test email was successfully sent."
If not, the following message appears: "The form could not be submitted because some of the inputs are not valid. Please correct the highlighted inputs." Also, the invalid inputs are highlighted in red, along with a message to enter a valid value for the offending setting.
Troubleshooting
Most common errors and how to resolve them.
jakarta.mail.MessagingException: Could not connect to SMTP host: example.com, port: 587;
nested exception is: javax.net.ssl.SSLException: Unsupported or unrecognized SSL message
Turn off “Use SSL” and retry. If the error persists, your mail server might not be publicly available and cannot be used in the iGrafx Cloud.
Email Templates
The Email Templates page provides the ability to view and modify the platform's emails.
To access your templates:
In the Administration area, choose Email Management
In the right pane,, click the EMAIL TEMPLATES tab
Email Templates List
All of the available outgoing email templates used by the application are displayed. Modified templates have a check-mark in the Customized? column. Also, customized templates have a Revert to Default button.
Email Templates | Trigger | Recipient |
|---|---|---|
Acknowledgement Cycle Canceled Email | A cycle manager cancelled the acknowledgement cycle | Nominator* |
Acknowledgement Cycle Paused Email | A cycle manager has manually paused the acknowledgement cycle OR there is a new approved version of the item OR the approved version of the item was revoked | Nominator* |
Acknowledgement Cycle Resumed Email | A cycle manager has manually resumed the paused acknowledgement cycle | Nominator* |
Acknowledgement Cycle Started Email | Acknowledgement cycle was started by a user | Cycle Participants, Nominator* |
Approval Cycle Canceled Email | A cycle manager cancelled the approval cycle | Cycle Participants, Nominator* |
Approval Cycle Finalized Email | All participants have approved the item. Approval cycle is completed. | Cycle Participants, Nominator* |
Approval Cycle Rejected Email | One participant vetoed/voted No. The approval cycle was rejected . | Cycle Participants, Nominator* |
Approval Cycle Started Email | Nominator has started the approval cycle manually or the system automatically started a scheduled approval cycle | Cycle Participants* |
Approved Version Change Email | New approved version of the object became effective | Watchers* |
Attention Needed Email | The attention needed email is sent out if a nominator manually starts cycles on multiple objects at once | Cycle Participants* |
Checkin Email | A new version of the item was checked in. | Watchers* |
Comment Deleted Email | Comment was deleted | Watchers* |
Comment Reopened Email | Comment was reopened | Watchers* |
Comment Resolved Email | Comment was resolved | Watchers* |
Commented Email | Commented | Watchers* |
Cycle Started (Automatic) Email | Cycle was scheduled to automatically start and the time has passed | Nominator if option was selected in the cycle schedule |
Cycle Started (Manual) Email | Cycle was scheduled to be manually started and time has passed | Nominator if option was selected in the cycle schedule |
Cycle Started Error Email | Cycle was supposed to started but does not meet all requirements -> Error | Nominator if option was selected in the cycle schedule |
Cycle Started Warning Email | A cycle was scheduled for an automatic start but failed for non-exceptional reasons, for example if a cycle is already running | Nominator if option was selected in the cycle schedule |
Endorsement Cycle Canceled Email | Endorsement cycle was canceled. | Cycle Participants, Nominator* |
Endorsement Cycle Finalized Email | All participants have taken action. Endorsement cycle is completed. | Cycle Participants, Nominator* |
Endorsement Cycle Started Email | Nominator has started an endorsement cycle or the system automatically started a scheduled approval cycle | Cycle Participants* |
Invitation Email | If administrator created a new user and selects to send an invite email or if administrator clicks "Send invite email" on a group | User who got invited |
Multiple Cycle Reminders Email | If more than one running cycle requires to remind a user to take action on the same day, this email will be sent out instead of separate emails for each cycle. This email is automatically sent by the system. | Cycle Participants* |
Review Cycle Canceled Email | Review cycle was canceled | Cycle Participants, Nominator* |
Review Cycle Finalized Email | All participants have reviewed the item. Review cycle is completed. | Cycle Participants, Nominator* |
Review Cycle Started Email | Review cycle cycle was started | Cycle Participants* |
Test Email | Send Test Email button under Administration → Email Management → Email Settings was clicked | Email address entered for the test |
Upcoming Cycle (Automatic) Email | Notifying the scheduling user of an upcoming cycle they set up, and that it will automatically start a the given time | Nominator if option was selected |
Upcoming Cycle (Manual) Email | Notifying the scheduling user of an upcoming cycle they set up, and that they will need to take action in the future | Nominator if option was selected |
*Recipients are configured under Repository → Email Notifications
Edit Email Template
You can edit any of the email templates by first clicking on the template name in the list. A text editor will allow you to modify its contents. The iGrafx platform uses Freemarker Templates to generate email content when sending email notifications. Modifications to these email templates will require some basic understanding of Freemarker. Documentation can be found here: Freemarker Documentation.
Clicking on the Preview button will provide a close approximation of what the actual email will look like. If there are any errors with the template, the error message will be displayed, allowing you to correct any mistakes caused by any modifications.
Initially the Preview will render in your chosen language. However, there is a language selector that allows you to change and preview the template in other languages (limited to the languages that are supported by the application).
Once you are done editing the template, you can either chose to SAVE CHANGES (lower, right of the page), or click on the "< Back to template list" link (near the top of the page). If changes are saved, then this newly saved customized template will now be used for that email.
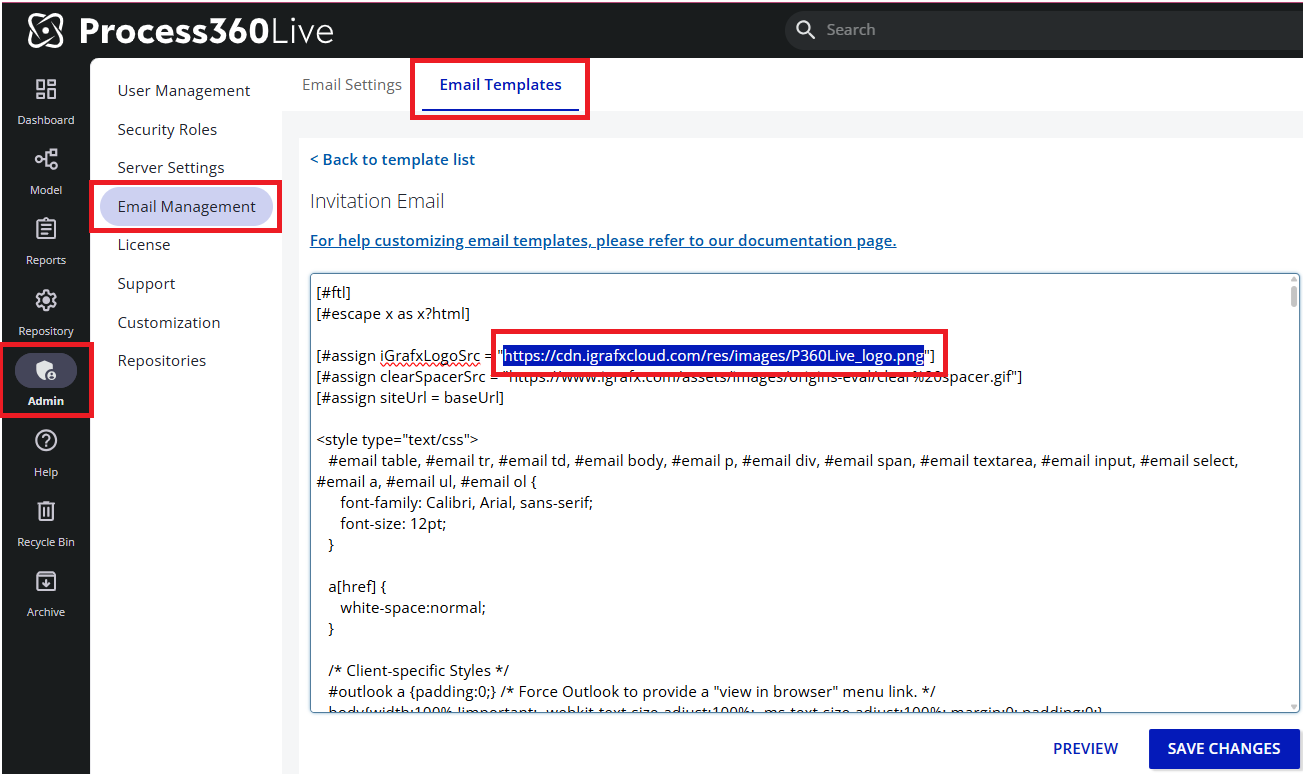
Example: Replacing the logo in the template
Open the template
Locate the placeholder logo URL in the template
Replace that URL with the URL of your company’s logo
⚠️ Make sure the logo URL is publicly accessible (hosted on a public web server or CDN). Private or internal URLs (e.g., behind a login or VPN) will not display properly.