Security roles in the iGrafx Platform provide a way to manage permissions over servers, repositories, and repository objects (items) by users and groups of users. There are three types of security roles:
Server roles specify permissions to perform administrative tasks within the application, like managing users or editing global themes and logos.
Repository roles specify permissions on a per-repository basis. Use them to grant access to individual repositories or to allow specific administrative tasks with repositories.
Item roles specify permissions on the objects within a repository. Item role assignments apply to one repository in the iGrafx Platform.
The iGrafx Platform allows you to change the permissions within the roles it provides as defaults, or to create additional roles with custom permission sets that you specify.
Security Roles for Cloud Customers
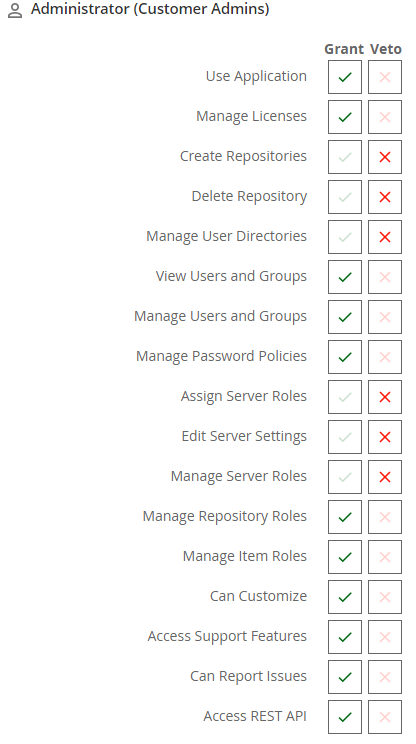
Cloud customers can define and assign Security Roles on the Repository and Item Level. Due to the nature of SaaS the permissions on the System Level are mostly reserved. Please see below for a list of system level permissions typically assigned to Customer Administrators.
Server Roles
The default set of server roles in the iGrafx Platform includes Administrator, Deny All, and User roles. As installed, the Administrator role grants all available permissions, the Deny All role vetoes all permissions, and the User role grants the sole permission of Use Application.
As a best practice, instead of changing the permission settings on the default server roles, create additional roles with alternate permissions settings. That way, you can help avoid confusion by naming the new, custom role, in a way that clarifies what the role does or does not allow.
Adding a Server Role
To add a new server role:
Choose the Administration area, and then Security Roles.
Click the SERVER ROLES tab.
Click ADD SERVER ROLE.
Type a name for the new role in the Role Name box. You can rename this role later.
Click ADD ROLE.
You can now grant and veto permissions for the new role as documented in the next section.
Setting Server Role Permissions
A new server role has no permissions settings. To make the role functional with actual permissions (or denials) to perform server actions, you grant or veto the server role permissions.
After adding a new server role, the new role is displayed with available permissions.
For each permission you wish to permit, click the Grant box.
For each permission you wish to deny, click the Veto box.
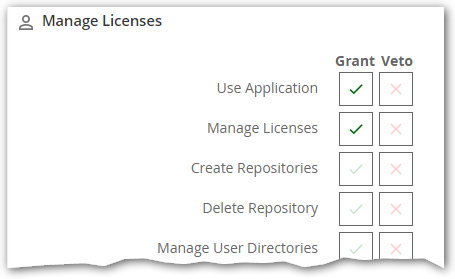
For example, for a new "Manage Licenses" role, two permissions are granted:
Actively granted or vetoed permissions appear with a bright green check mark or bright red , respectively.
It is unnecessary to select Veto for those permissions that you do not explicitly select grant, and it is unnecessary to select Grant for those permissions that you don't explicitly veto. Keeping permissions that aren't specifically relevant to this server role unspecified, or "abstained," allows them to be granted or vetoed by other server roles a user may be assigned, and helps prevent conflicts among role assignments.
If a user or group is not assigned any role that grants a permission then the effective permission is Veto.
Rename or Delete a Server Role
Choose the Administration area, and then Security Roles.
Click the SERVER ROLES tab.
If necessary, locate the role you want to rename in the list by scrolling, using the alphabetical "Jump to" links, or by typing in the Search box.
If the server role you wish to rename or delete is not expanded, click the server role to expand its display.
Scroll to the bottom of the server role display.
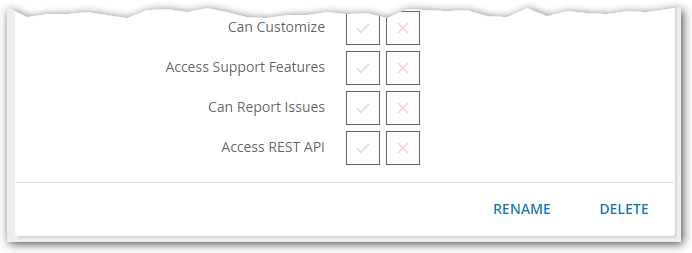
Click RENAME or DELETE.
Assigning Server Roles
You can assign server roles with these methods:
"Assign Role to User/Group" Command -- This is the recommended method because all existing roles, users, and groups are available for selection. In the other methods, only users/groups or roles that have already been assigned are available as a starting point.
The "Assign a Role to User/Group" command provides all existing roles, users, and groups available for selection.
Choose the Administration area, and then Security Roles.
Click the SERVER ROLE ASSIGNMENTS tab.
Click ASSIGN ROLE to USER/GROUP.
Select one or more users or groups:
Type the name of an existing user or group in the Search field and select it when found
Click the Search button and select a user or group
Click CONTINUE.
Select one or more server roles:
Type the name of an existing server role in the Search field and select it when found or
Click the Search button and select a server role
Click FINISH.
Select a Role then "Assign"
Choose the Administration area, and then Security Roles.
Click the SERVER ROLE ASSIGNMENTS tab.
In the View area, click Roles.
If necessary, locate the role you want to assign in the list by scrolling, using the alphabetical "Jump to" links, or by typing in the Search box.
Only roles that have been assigned to a user or group are displayed in the "Roles" list. To add a user or group to a role that is currently unassigned, follow the instructions in Assign a Role to User/Group" Command.
Click the role (to expand the role) to which you want to assign to a user or group. The users and groups already assigned that role appear underneath it, along with the ASSIGN button.
Click ASSIGN.
Select one or more users or groups:
Type the name of an existing user or group in the Search field and select it when found or
Click the Search button and select a user or group
Click CONFIRM SELECTION.
Select a User or Group then "Assign"
Choose the Administration area, and then Security Roles.
Click the SERVER ROLE ASSIGNMENTS tab.
In the View area, click Users/Groups.
If necessary, locate the user or group you want to assign in the list by scrolling, using the alphabetical "Jump to" links, or by typing in the Search box.
Only those users and groups that have roles assigned to them appear in the Users/Groups list. To add a server role to users or groups that currently have no role, follow the instructions in Assign a Role to User/Group" Command.
Click the user or group (to expand it) to which you want a role assigned. The roles assigned to that user or group appear underneath it, along with the ASSIGN button.
Click ASSIGN
Select one or more roles:
Type the name of an existing role in the Search field and select it when found or
Click the Search button and select a role
Click CONFIRM SELECTION.
If you assign multiple server roles to the same user or group, and those roles have conflicting Grant and Veto settings for the same permission, the Veto setting will be the one in effect.
Removing Server Role Assignments
You can remove server role assignments by a specific user or group, or by server role, depending on which view you display on the Server Role Assignments page, as described in these sections:
To remove server role assignments for a single user or group:
Choose the Administration area, and then Security Roles.
Click the SERVER ROLE ASSIGNMENTS tab.
In the View area, click Users/Groups.
If necessary, locate the user or group for which you want to remove a server role by scrolling through the list, using the alphabetical "Jump to" links, or by typing in the search box.
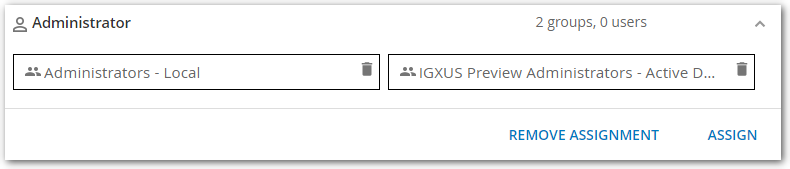
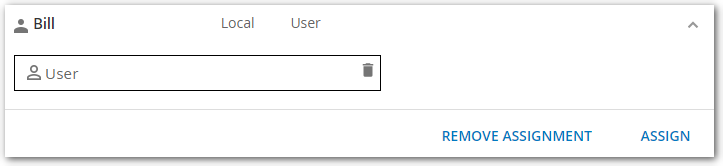
Click the user or group (to expand it). The roles assigned to that user or group appear underneath it,
To remove a single role assignment click the garbage can icon associated with the role.
To remove all role assignments click REMOVE ASSIGNMENT and click REMOVE ASSIGNMENT again to confirm.
Remove Server Role Assignments by Server Role
To remove server roles assignments for a single server role:
Choose the Administration area, and then Security Roles.
Click the SERVER ROLE ASSIGNMENTS tab.
In the View area, click Roles.
If necessary, locate the server role for which you want to remove an assignment by scrolling through the list, using the alphabetical "Jump to" links, or by typing in the search box.
Click the role (to expand it). The users and groups that are assigned that role appear underneath it,
To remove a single server role assignment click the garbage can icon associated with the user or group.
To remove all server role assignments click REMOVE ASSIGNMENT and click REMOVE ASSIGNMENT again to confirm.
Repository Roles
For administrators familiar with the above Server Role commands, the following Repository Role commands will be behave almost the same.
The default set of repository roles in the iGrafx Platform includes Administrator, Deny All, and User roles. As installed, the Administrator role grants all available permissions, the Deny All role vetoes all permissions, and the User role grants the sole permission of Use Application.
Instead of changing the permission settings within these three default repository roles, consider creating additional roles with alternate permissions settings as a best practice. That way, you can help avoid confusion by naming the new, custom role in a way that makes obvious what it does or does not allow.
Adding a Repository Role
To add a new repository role:
Choose the Administration area, and then Security Roles.
Click the REPOSITORY ROLES tab.
Click ADD REPOSITORY ROLE.
Type a name for the new role in the Role Name box. You can rename this role later.
Click ADD ROLE.
You can now grant and veto permissions for the new role as documented in the next section.
Setting Repository Role Permissions
The permission to create and delete a repository (not just use or manage one) are defined by Server Roles, as is the permission to set the repository roles permissions described here. See the above Setting Server Role Permissions topic.
A new repository role has no permissions settings. To make the role functional with actual permissions (or denials) to perform repository actions, you grant or veto the repository role permissions.
For each permission you wish to permit, click the Grant box.
For each permission you wish to deny, click the Veto box.
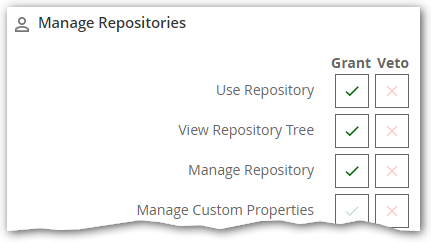
For example, for a new "Manage Repositories" role, three permissions are granted:
Actively granted or vetoed permissions appear with a bright green check mark or bright red , respectively.
It is unnecessary to select Veto for those permissions that you do not explicitly select grant, and it is unnecessary to select Grant for those permissions that you don't explicitly veto. Keeping permissions that aren't specifically relevant to this repository role unspecified, or "abstained," allows them to be granted or vetoed by other repository roles a user may be assigned, and helps prevent conflicts among role assignments.
If a user or group is not assigned any role that grants a permission then the effective permssion is Veto.
Rename or Delete a Repository Role
Choose the Administration area, and then Security Roles.
Click the REPOSITORY ROLES tab.
If necessary, locate the role you want to rename or delete in the list by scrolling, using the alphabetical "Jump to" links, or by typing in the Search box.
If the repository role you wish to rename or delete is not expanded, click the repository role to expand its display.
Scroll to the bottom of the repository role display.
Click RENAME or DELETE.
Assigning Repository Roles
You can assign repository roles with these methods:
"Assign Role to User/Group" Command -- This is the recommended method because all existing roles, users, and groups are available for selection. In the other methods, only users/groups or roles that have already been assigned are available as a starting point.
The "Assign a Role to User/Group" command provides all existing roles, users, and groups available for selection.
Choose the Administration area, and then Security Roles.
Click the REPOSITORY ROLE ASSIGNMENTS tab.
Click ASSIGN ROLE to USER/GROUP.
Select one or more users or groups:
Type the name of an existing user or group in the Search field and select it when found or
Click the Search button and select a user or group
Click CONTINUE.
Select one or more repository roles:
Type the name of an existing repository role in the Search field and select it when found or
Click the Search button and select a repository role
Click CONTINUE.
Select one or more repositories
Type the name of an existing repository in the Search field and select it when found or
Click the Search button and select a repository or click All repositories
Click FINISH.
Select a Role then "Assign"
You can add users or groups to a specific repository role in the Roles list.
Choose the Administration area, and then Security Roles.
Click the REPOSITORY ROLE ASSIGNMENTS tab.
In the View area, click Roles.
If necessary, locate the role you want to assign in the list by scrolling, using the alphabetical "Jump to" links, or by typing in the Search box.
Only those roles that have been assigned to a user or group appear in the Roles list. To add a user or group to a role that is currently unassigned, follow the instructions in "Assign Role to User/Group" Command
Click the repository role (to expand it) to which you want to assign to a user or group .
The users and groups already assigned to that role appear underneath it, along with the ASSIGN button.
Click ASSIGN.
Select one or more users or groups:
Type the name of an existing user or group in the Search field and select it when found or
Click the Search button and select a user or group
Click CONTINUE.
Select one or more repositories:
Type the name of an existing repository in the Search field and select it when found or
Click the Search button and select a repository or click All repositories
Click FINISH.
Notice that when a role is expanded in the Repository Role Assignments list, users and groups listed underneath it are sorted by the repositories that their roles are applied to. Users and groups may be repeated under a role for individual repositories or all repositories.
Select a User or Group then "Assign"
Choose the Administration area, and then Security Roles.
Click the REPOSITORY ROLE ASSIGNMENTS tab.
In the View area, click Users/Groups.
If necessary, locate the user or group you want to assign in the list by scrolling, using the alphabetical "Jump to" links, or by typing in the Search box.
Only those users and groups that have roles assigned to them appear in the Users/Groups list. To add a repository role to users or groups that currently have no role, follow the instructions in"Assign Role to User/Group" Command
Click the user or group to which you want a role assigned to (so that it is expanded).
Click ASSIGN
Select one or more roles:
Type the name of an existing role in the Search field and select it when found or
Click the Search button and select a role
Click CONTINUE.
Select one or more repositories
Type the name of an existing repository in the Search field and select it when found or
Click the Search button and select a repository or click All repositories
Click FINISH.
If you assign repository roles to the same user or group, and those roles have conflicting Grant and Veto settings for the same permission, the Veto setting will be the one in effect.
Removing Repository Role Assignments
You can remove repository role assignments by a specific user or group, or by repository role, depending on which view you use on the Repository Role Assignments page, as described in these sections:
Remove Repository Role Assignments by User or Group
To remove repository role assignments for a single user or group:
Choose the Administration area, and then Security Roles.
Click the REPOSITORY ROLE ASSIGNMENTS tab.
In the View area, click Users/Groups.
If necessary, locate the user or group for which you want to remove a repository role by scrolling through the list, using the alphabetical "Jump to" links, or by typing in the search box.
Click the user or group (to expand it). The repository roles assigned to that user or group appear underneath it,
To remove a single role assignment click the garbage can icon associated with the role.
To remove ALL role assignments click REMOVE ASSIGNMENT and click REMOVE ASSIGNMENT again to confirm.
Remove Repository Role Assignments by Repository Role
To remove repository role assignments for a single repository role:
Choose the Administration area, and then Security Roles.
Click the REPOSITORY ROLE ASSIGNMENTS tab.
In the View area, click Roles.
If necessary, locate the repository role for which you want to remove an assignment by scrolling through the list, using the alphabetical "Jump to" links, or by typing in the search box.
Click the role (to expand it). The users and groups that are assigned that role appear underneath it,
To remove a single repository role assignment click the garbage can icon associated with the user or group.
To remove ALL repository role assignments click REMOVE ASSIGNMENT and click REMOVE ASSIGNMENT again to confirm.
Revoking access to a repository role revokes access for all users and groups assigned that role. Proceed carefully! To revoke access to specific users and groups assigned to a role, use the garbage can icon.
Item Roles
Item roles are used to grant and deny permissions on objects in all available repositories.
The default set of item roles in the iGrafx platform includes the following item roles:
Administrator – Grants all available permissions
Annotator – Grants View, most Comment, Print, See Unapproved, and See History permissions
Author – Grants all permissions except Modify Project Status, Manage Elective Wathers, Manage Required Watchers, and Administer
Deny all – Vetoes all available permissions
None – No permissions granted or vetoed
View approved only – Grants View, View Diagram Comments, and Print permissions
Viewer – Grants View, View Diagram Comments, Print, and See Unapproved permissions
Instead of changing the permission settings within these default item roles, consider creating additional roles with alternate permissions settings as a best practice. That way, you can help avoid confusion by naming the new, custom role in a way that makes obvious what it does or does not allow.
The following sections describe how you can work with item roles.
For information on assigning and removing item roles for users and groups on repository items, see Repository Permissions.
Adding an Item Role
To add a new item role:
Choose the Administration area, and then Security Roles.
Click the ITEM ROLES tab.
Click ADD ITEM ROLE.
Type a name for the new role in the Role Name box. You can rename this role later.
Click ADD ROLE.
You can now grant and veto permissions for the new role as documented in the next section.
Setting Item Role Permissions
A new item role has no permissions settings. To make the role functional with actual permissions (or denials) to perform item actions, you grant or veto the item role permissions.
After adding a new item role, the new role is displayed with available permissions.
For each permission you wish to permit, click the Grant box.
For each permission you wish to deny, click the Veto box.
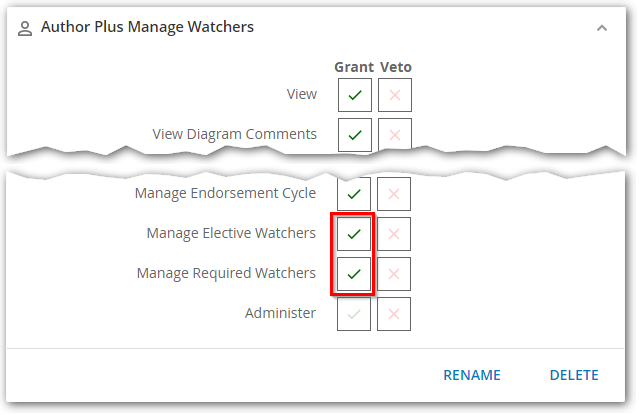
For example, for a new "Author Plus Manage Watchers" role, two additional permissions (highlighted below) are granted that are not granted to the default "Author" item role:
Actively granted or vetoed permissions appear with a bright green check mark or bright red , respectively.
It is unnecessary to select Veto for those permissions that you do not explicitly select Grant, and it is unnecessary to select Grant for those permissions that you don't explicitly Veto. Keeping permissions that aren't specifically relevant to this item role unspecified, or "abstained," allows them to be granted or vetoed by other item roles a user may be assigned, and helps prevent conflicts among role assignments.
If a user or group is not assigned any item role that grants a permission then the effective permssion is Veto.
Rename or Delete an Item Role
Choose the Administration area, and then Security Roles.
Click the ITEM ROLES tab.
If necessary, locate the role you want to rename or delete in the list by scrolling, using the alphabetical "Jump to" links, or by typing in the Search box.
If the Item role you wish to rename or delete is not expanded, click the item role to expand its display.