Database setup
Before you install the iGrafx platform, prepare its database. This page uses Microsoft SQL Server as the example; the steps follow the same shape on any supported database server.
iGrafx supports SQL Server, but doesn't provide technical support for the SQL Server product itself. Refer to the Microsoft documentation for SQL Server installation and administration.
Prerequisites
- A database server version listed on the System Requirements page.
- Administrative access to install software and create databases on that server.
Steps
Install SQL Server
The installer runs a wizard. Before you start, check the hardware and software requirements on microsoft.com.
- Insert the SQL Server DVD or mount the downloaded ISO image.
- Run
setup.exe. - Select System Configuration Checker and fix any reported issues before continuing.
- Select Installation, then New SQL Server stand-alone installation or add features to an existing installation.
- Follow the wizard. The platform needs these choices (leave everything else at its default or set it as you prefer):
-
On Feature Selection, select Database Engine Services and Management Tools - Complete. Documentation Components is optional.
noteFrom iGrafx platform 16.2 on, the application server does the indexing. Don't install Full-Text and Semantic Extractions for Search (the Full-Text-Index Engine, FTE) — earlier platform versions required it, newer ones don't.
-
On Server Configuration → Service Accounts, set the account name, password, and startup type for the SQL Server Database Engine. You can use a built-in system account, a local account or group, or a domain account; iGrafx recommends the minimum rights needed. Set the SQL Server Database Engine startup type to Automatic.
-
On Database Engine Configuration → Server Configuration, choose Mixed Mode. This lets you define a local SQL Server user for the platform application server to connect with. Alternatively, use an Active Directory user or service account from your IT department.
-
Create the databases
The platform uses two table structures: the administrative tables and the repository tables. They can share one database or live in separate databases, and you can combine several repositories into one database.
For the best performance and data security, keep the administrative tables and repository tables separate and avoid more than one repository per database — otherwise restoring a backup rolls back every repository in that database, not only the one you need. Back up all databases on the same schedule so a recovery stays consistent. Sharing a database is reasonable only when you don't need individual backups and want to keep the number of databases low.
-
Open Microsoft SQL Server Management Studio.
-
Right-click the Databases folder and select New Database.
-
Enter a database name.
-
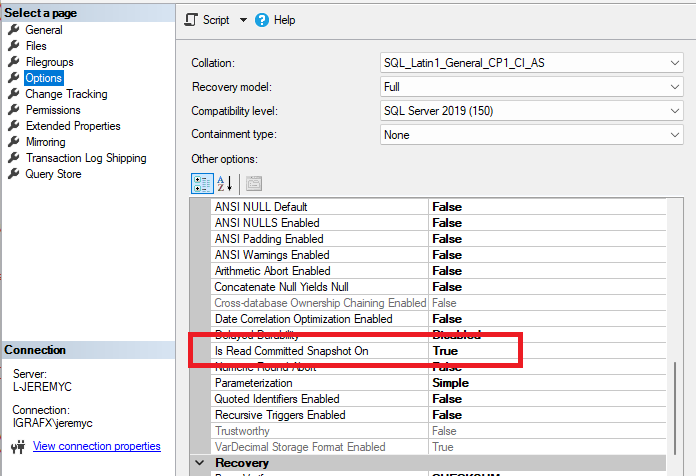
On the Options tab, set the collation. The recommended setting is SQL_Latin1_General_CP1_CI_AS.
warningIf you choose a different collation, it must be case insensitive (CI).
-
Set Is Read Committed Snapshot On to True — otherwise application performance can suffer.
-
Click OK to create the database.
Create the database user
The application server connects to the database as a local or directory (for example, Active Directory) user. If you use separate databases, you can use the same user or separate users.
-
Open Microsoft SQL Server Management Studio.
-
Right-click Security / Logins and select New Login.
-
Add a Windows or SQL Server authenticated user.
-
On the Server Roles page, keep the default
publicrole. -
On the User Mapping page, map the user to the database and assign either of these role sets:
publicanddb_owner, orpublic,db_datareader,db_datawriter,db_ddladmin, anddb_executor.
db_executordoesn't exist by default — create it once per database:-- Create a db_executor roleCREATE ROLE db_executor-- Grant execute rights to the new roleGRANT EXECUTE TO db_executor
Related
- Connect the iGrafx platform to the database — the next step, after the application server is deployed
- Server sizing recommendations
- System Requirements