Create and edit a diagram
Everything you draw lives in a web diagram. This page covers the editor end to end — creating the diagram, drawing and connecting shapes, structuring with pools and lanes, and preparing pages for print. For a guided first run, take the tutorial.
Prerequisites
- The Create item permission on the destination folder and a license that includes web diagram editing — see the License capability matrix.
- The diagram checked out to you. Only viewing a diagram works without a check-out.
Steps
Create the diagram
- Select the destination folder, then Add Object, and choose the type Diagram.
- Under Start with, choose how to begin: Diagram View (the visual editor), QuickMap (build the diagram from a table of steps), or Import a file (see Import diagrams).
- Where a Template step appears, pick a built-in template or one of your repository's own.
- Name the diagram, pick the first version number, and click Finish. The diagram opens checked out to you.
Find your way around the editor
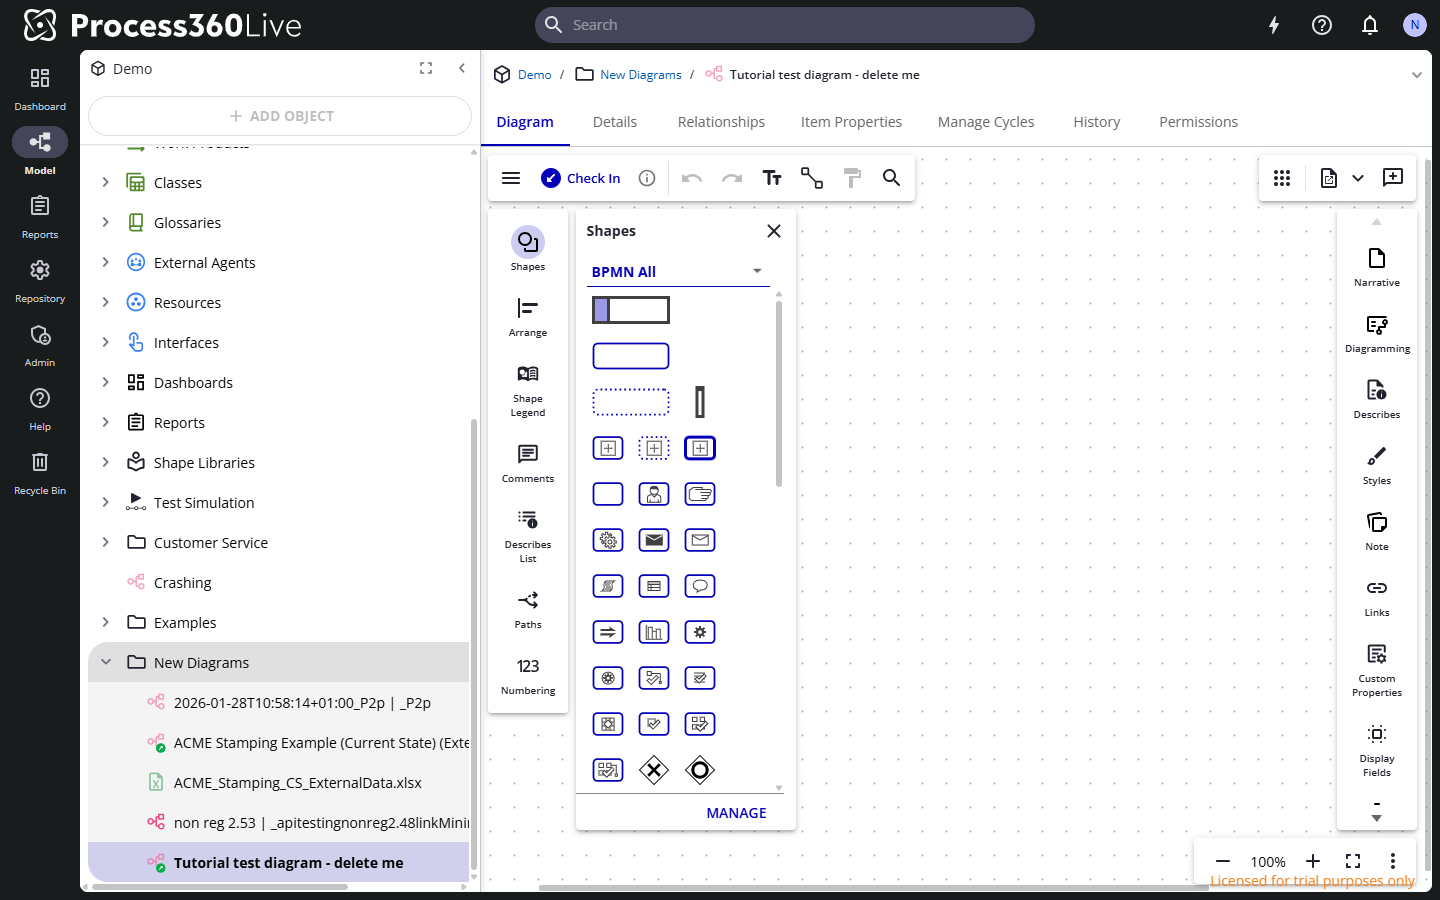
- Main toolbar (top): the app menu (export, import, page setup, compare), Check In / Check Out, undo/redo, Add text, Add lines, Format Painter, and Find in Diagram.
- Side toolbars (left and right): panels such as Shapes, Arrange, Styles, Describes, Note, Links, Custom Properties, Comments, and Paths. Drag the buttons to rearrange them — even between sides — or pick Customize side panels in the view bar's menu.
- View bar (lower right): zoom, full screen, and display options — see View a diagram.
Draw shapes and flows
- Open the Shapes panel and pick a library. Click Manage to change which libraries this diagram offers.
- Drag a shape onto the canvas and type to add Shape textShape text The text displayed on a diagram shape. Type while a shape is selected to add or edit it. Part of the shape feature family alongside Shape Links and Shape Properties..
- Grow the flow from a selected shape: orange circular handles on its faces place a connected next shape — the same type you last added — and the Quick Shape Menu that opens lets you switch the type if you want a different one (Ctrl+Space opens the same menu for a selected shape later). The connection is drawn for you.
- For free connections, use the Add lines tool: draw from one shape to another, and select the tool again when you're done — it stays active until you do. Add text places free-standing text, which the Add lines tool can connect to shapes; it turns itself off once you finish the text (Shift+Enter, or a click outside it).
- As you drag, smart guides help you line shapes up; undo anything with Ctrl+Z. To align or evenly space a selection, see Align and arrange shapes below.
In BPMNBPMN An ISO/OMG standard graphical notation for modeling business processes. Process360 Live uses BPMN 2.0 for design and simulation artifacts. diagrams with Error Checking turned on (a toggle in the app menu, saved with the diagram), warning icons flag conformance problems — for example a decision gateway missing an outgoing flow; select the icon to read the message. Event shapes take their start/intermediate/end look automatically from their connections.
Align and arrange shapes
Line shapes up as you drag, or tidy a whole selection with the Arrange panel.
- Smart guides — while you drag a shape, dotted lines mark edge and center alignment with nearby shapes (including centering inside a pool or lane), and double-headed arrows mark even spacing. Turn snapping off in the view bar's more-options menu when you don't want it.
- Arrange panel — with several shapes selected, use the Arrange panel to Align (left, center, right, top, middle, bottom), Distribute (Space Evenly Across, Space Evenly Down), set the Order (Move Forward, Move Backward), or Size them (Make Same Width, Make Same Height, Make Same Size). Many have keyboard shortcuts too — see Keyboard shortcuts for web diagrams.
- Snap Objects To Grid — in the Arrange panel's Grid section, the grid icon, tooltip Snap Objects To Grid, pulls the selected shapes and their connector ends back onto the grid; an end attached to a shape slides along the face it's attached to. The grid itself is absolute, so a shape that sits off it also lands back on the grid the next time you move it — the command is for tidying shapes without moving them one by one.
- Adjust Spacing — in the Arrange panel's Adjust Spacing section, select Start (the Adjust Space Tool, Ctrl+M) to add or remove space across a whole region at once: drag in the diagram and every shape beyond the drag shifts with it. Click Done to leave the tool.
Structure with pools, lanes, and phases
- Drag a Pool from the Shapes panel onto the canvas and click its header to type the participant or process name. With the pool header selected, green circular handles with a plus appear at the pool's top and bottom and on every lane boundary — click one to add a Lane there. With a lane selected instead, the handles split that lane into sublanes; add sibling lanes from the parent's handles. Add shape textShape text The text displayed on a diagram shape. Type while a shape is selected to add or edit it. Part of the shape feature family alongside Shape Links and Shape Properties. to lanes the same way — click and type roles, systems, or organizations.
- Phases partition a pool into stages: select the pool header and drag the phase indicator — a green square trailing a dashed line, centered on the phase header — to create and position phase borders. Dragging a phase line moves the shapes in the phase with it.
- Combine several pools into one — select two or more pools of the same orientation (all horizontal, or all vertical), right-click the selection, and choose Convert Selection to → New Pool. iGrafx wraps them in a single new pool and turns each selected pool into a lane. Lanes follow the pools' position: top to bottom for horizontal pools, left to right for vertical ones. Each lane keeps its original pool's name, any lanes it already had (now sublanes), and its shapes; the new pool takes the phases of the first pool in that order. Styling carries over per lane — each lane keeps the fill, gradient, pattern, and line style of the pool it came from — while the new outer pool uses the default pool style.
- Pool options — such as Hide Header — live in the Diagramming panel while the pool is selected.
- When the shape textShape text The text displayed on a diagram shape. Type while a shape is selected to add or edit it. Part of the shape feature family alongside Shape Links and Shape Properties. of a lane or shape matches repository objects, a repository icon appears under the element — click it and pick a match to describe the object in one move.
Split into sub-processes
- A Collapsed Sub-Process shape holds a child diagram stored inside the same diagram object — select the plus on the shape to create and open it, and return through the breadcrumb at the top of the diagramming area.
- A Call ActivityActivity A named step in a process (e.g. "Approve Invoice"). Each event in an event log records one activity occurrence for one case. shape links to a separate diagram object for reuse: select the shape, open the Diagramming panel, and click Choose to pick the diagram to call.
Link shapes to files and pages
- Right-click a shape and choose Add Link to Shape to link it to a repository object — for example the external file holding a work instruction — or to a URL. The shape shows a link icon readers can follow.
- To link from text, select the characters inside the shape textShape text The text displayed on a diagram shape. Type while a shape is selected to add or edit it. Part of the shape feature family alongside Shape Links and Shape Properties., select the link icon that appears, and create the link.
- The Links panel lists the selected shape's links and is where you manage them. Click Link to add a URL or Browse to pick a repository object — the same dialog the shape's right-click menu opens — or drag an item onto the panel from the repository tree.
- Each entry in the panel carries icon-only buttons: a pencil, tooltip Edit; a trash can, tooltip Delete; and a drag handle, tooltip Click and drag to reorder.
Notes
Select a shape and open the Note panel to attach rich-text documentation — procedures, methods, instructions. A note indicator appears on the shape; readers select it to read the note.
Pages, headers, and printing
- Page Setup and Print to PDF (app menu): the page size, orientation, and pagination the diagram saves, what prints with it, and how to print a single copy differently — see Set up pages and print to PDF.
- Header and Footer (app menu): three sections each (left, center, right) with insertable fields — current date/time/user, page numbers, diagram info (name, creator, object ID, process ownerProcess Owner The person accountable for a specific business process — its design, performance, and improvement. The primary stakeholder for mining and simulation outputs.), version info, cycle info (reviewed/approved/endorsed and their dates), described-object info, and custom properties.
Save your work
Select Check In, pick the version number, and comment. Readers now see the new version; check out again to continue. See the tutorial for the full save loop.
Take over a checked-out diagram
A checked-out diagram is locked to the person editing it. If that person is unavailable, you can take it over from the app menu — this requires the Administer item permission on the diagram:
- Undo Check Out discards the working draft and returns the diagram to its latest checked-in version. Any changes in the draft are lost — the confirmation warns you before it proceeds.
- Transfer Draft hands the working draft, with all its unsaved changes, to a user you pick — they continue right where the previous editor stopped.